My Dollar Tree put out all their fall decor and florals! Ahhhh I’m so excited! I love fall best of all and I love decorating and crafting during the fall 🙂 I went to DT a few days ago and gathered up some florals, a metal wreath form, and some ribbon and twine to make my own fall wreath . . . I was excited to see how many cute pumpkins and other decor they had out, too. I think I want to go back in a few weeks to gather up some new decor for my house, after I get all my decor from last year out and get my new fall wreath up on my door!
I was excited to sit down and craft for fall. I made a latte, of course, and got creative.
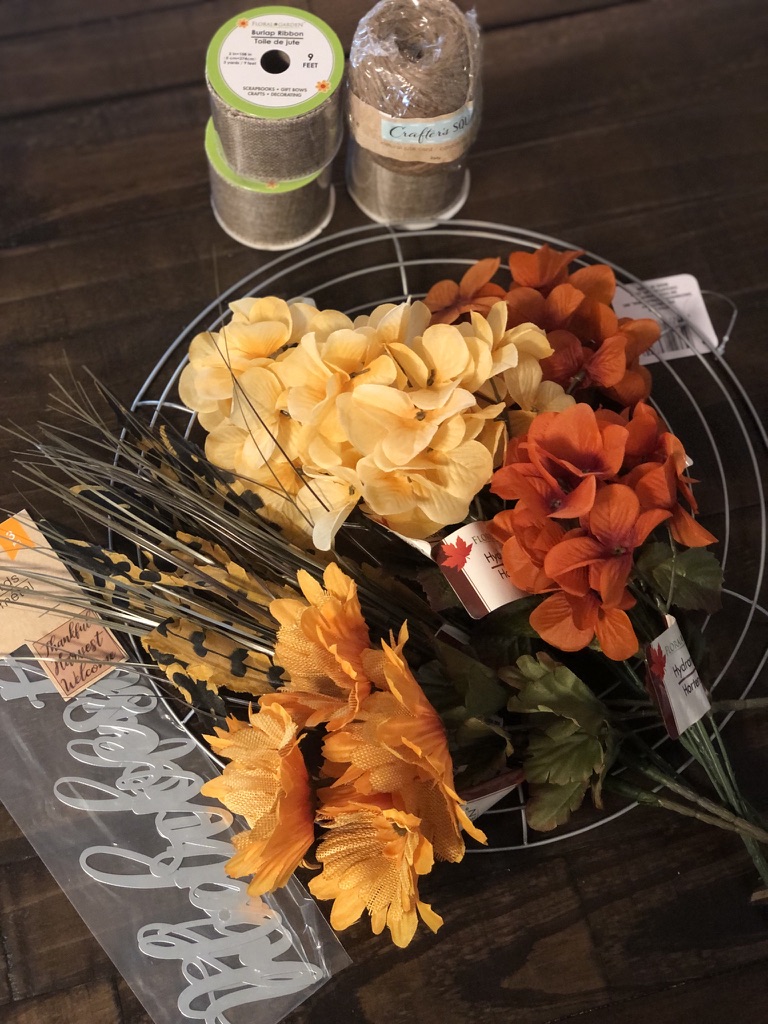
For this project, you will need:
- metal wreath form
- florals
- hot glue
- burlap ribbon (18-20 feet total)
- twine
- metal die-cut words
Everything here was $1 a piece, including the 3-pack of metal die-cut words (which is a steal of a deal!). So, total for my fall wreath, I spent about $12. I already had my hot glue gun and sticks but that’s the only thing I didn’t get at Dollar Tree. You really can’t beat that price for a piece you can customize for your own home.
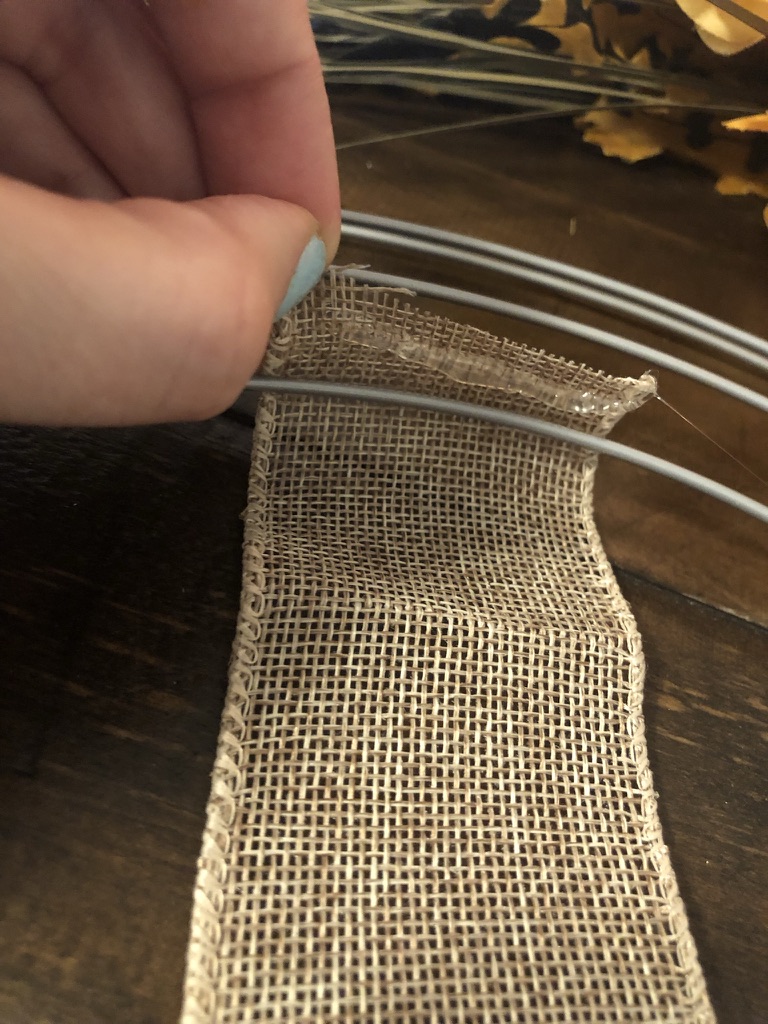
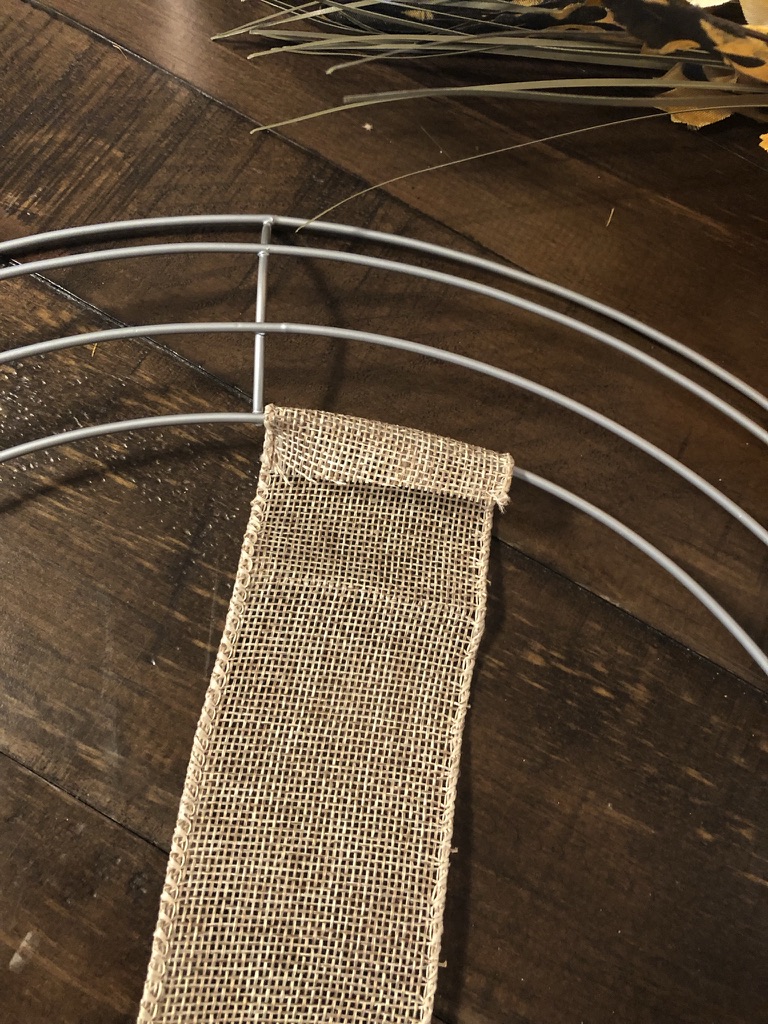
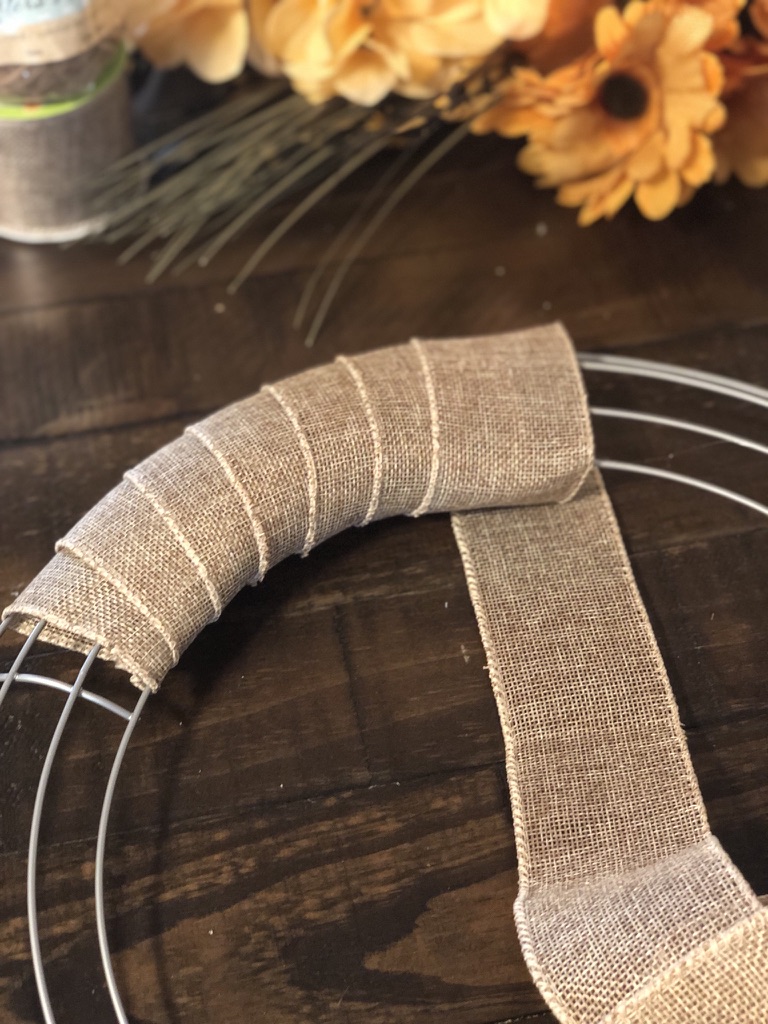
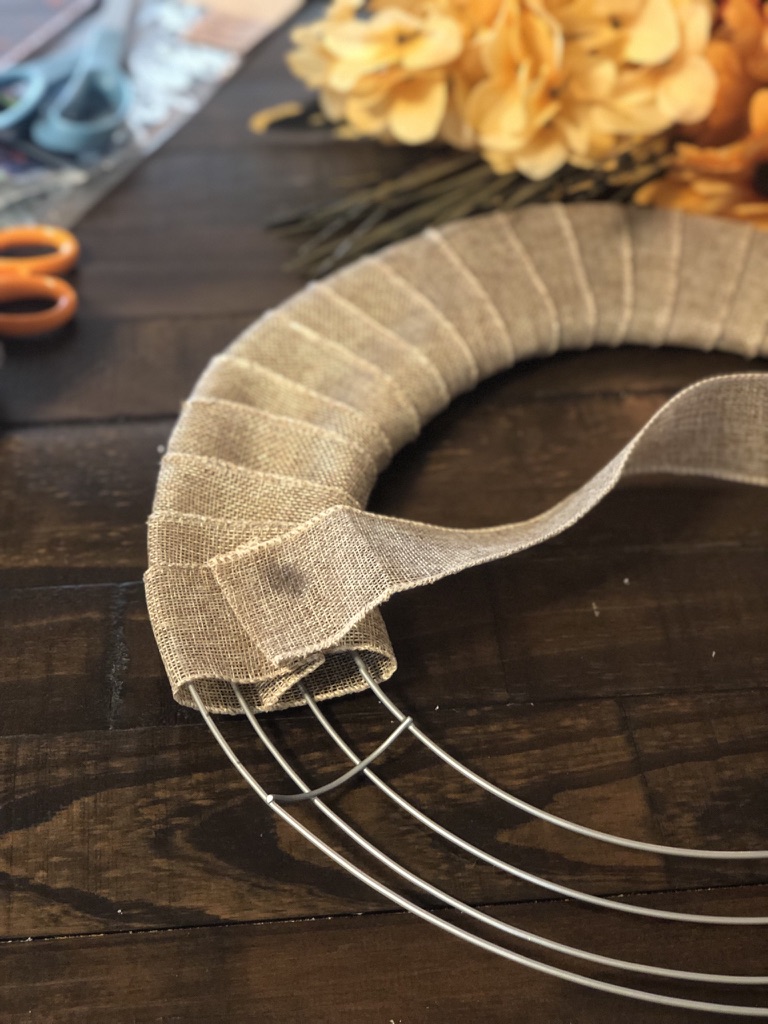
To make the ‘base’ of your fall wreath, use the burlap ribbon and wrap it around the metal wreath. Add a line of hot glue to the ribbon where you start wrapping the ribbon to keep it in place. Wrap the burlap ribbon around the wreath, making sure to not wrap it too tightly, but not too loosely that it moves around. You want to overlap the ribbon so it covers up the metal wreath form.
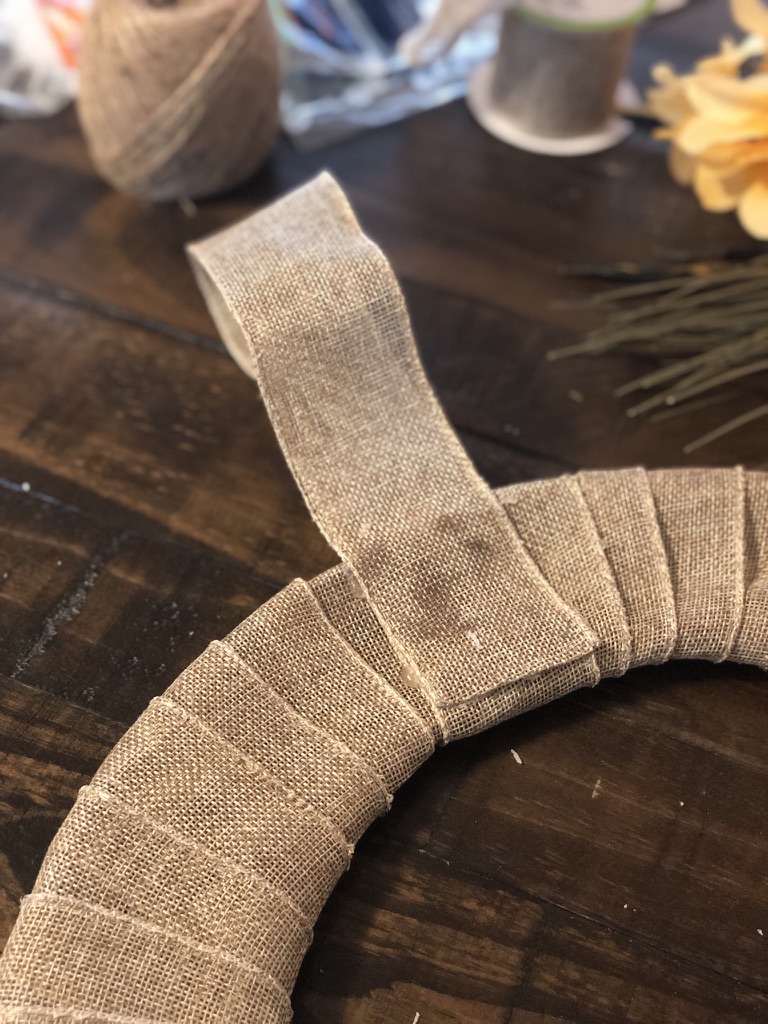
Keep wrapping until you run out of burlap ribbon, occasionally adding some dots of hot glue to the metal wreath to hold the ribbon in place. I used just barely over two 9-foot rolls (so a little over 18 feet). When you finish up one roll, just start overlapping the next roll, as pictured below.
After you’ve wrapped up the entire wreath form, finish it up by adding a loop of burlap ribbon to the top. *To make my loop, I just used the burlap ribbon piece that I was using to wrap the metal form and kept it going for the loop, so I wouldn’t have to cut and make a separate loop. I trimmed the edge and hot glued it (a lot!) to the back of the wreath.
After the glue dries, cut a piece of twine about 22″ long to tie in a bow around the base of the loop.
Now it’s time for the florals! Start by laying out all the florals on the fall wreath to decide exactly what you want to go where, before you glue. This is an important step – you don’t want to start gluing and then find out you don’t have enough florals, or you don’t like the way it looks.
First, I started with my two feather-and-grass bunches. I wanted those to kind of ‘frame in’ the fall wreath. I wanted the height of the tall grass and feathers on the sides of the wreath to create a bit of a whimsical feel to the fall wreath.
*When you’re arranging florals on a wreath, really try to get some nice depth happening with the different greeneries and flowers. Build out from back to front. Play with the textures, heights, and contrasting colors to really make it pop. And always find a central flower or something that you are going to use in the center of your wreath as a focal point. That makes it easier to layer your florals when you have a ‘statement piece’ to base everything around! In this case, the gerber daisies were my focal piece. So I arranged my florals and layered everything in a way I thought looked good underneath the flowers.
I used two bunches of the ‘orange hydrangeas’, two bunches of the ‘yellow hydrangeas’, and one bunch of the ‘gerber daisies’ from Dollar Tree. To make it easier to layer them how you want, you’re going to want to cut each stem off of the main stem. This makes it so you have smaller flowers to work with and you will find it much easier to arrange them this way.
After you’ve arranged and rearranged and decided how you want everything to look for your finished fall wreath, it’s time to glue! I went through quite a few hot glue sticks because I love hot glue and I really wanted to make sure everything was gonna stay in place 😉
Trim the stems as you go . . . depending on what way you wrapped your burlap ribbon around the wreath form, and what side of the wreath you’re working on, you may be able to stick the stems of the flowers into the ribbon to help it stay in place. You’ll still want to add hot glue though, so don’t skip out on that.
Make sure when you are layering and gluing, you are slyly covering up any glue that may be visible. I like to use flat leaves to cover spots of hot glue that I notice aren’t very covered up by the flowers or stems. I don’t want any glue to be seen!
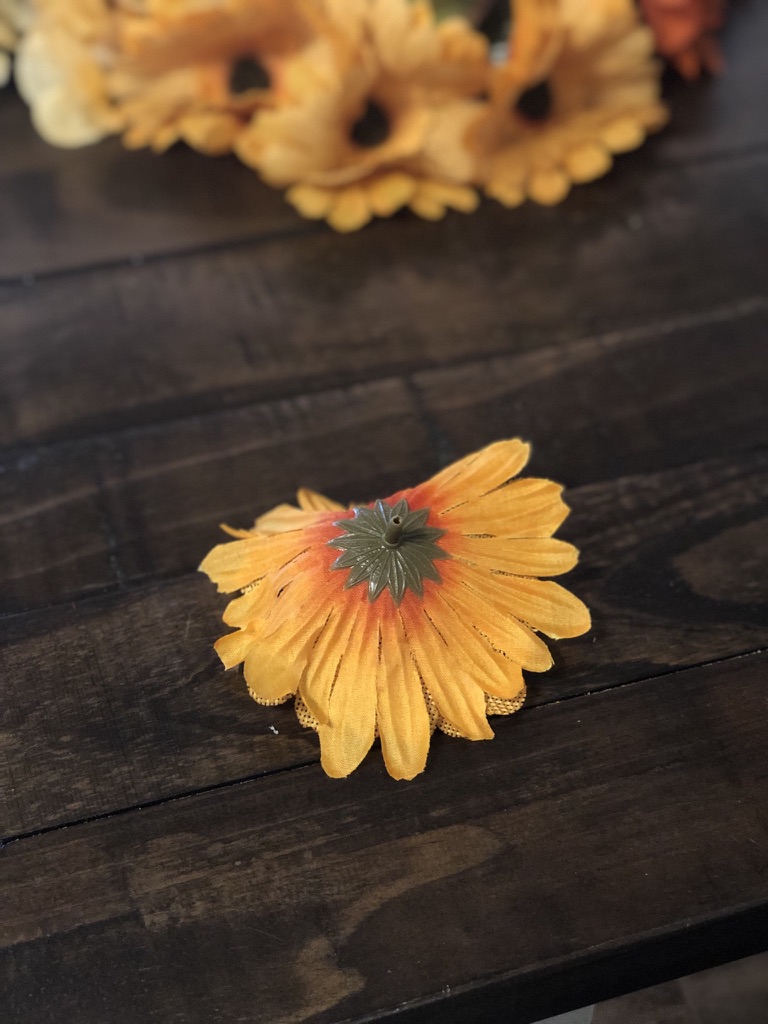
After you’ve layered and glued the pieces that will be behind the focal piece, it’s time to get your central flowers in place! Because these flowers are the center focal point of my fall wreath, I went ahead and plucked them off of the stem so I wouldn’t have to worry about dealing with extra stems. I wanted them to sit flat on the wreath, as well.
Secure your flowers on the wreath with hot glue – you can also use your scissors to punch a small hole in the burlap to stick the flower through. I did that and then also made sure the flowers were secure by adding hot glue.
I arranged my four daisies in a sort of diamond pattern in the center. I had tried out using just two or three of the flowers but I felt like having all four there in the center looked better and fuller.
Optional step – after I secured all my florals, I went ahead and wrapped twine around the top half of the wreath, crisscrossing it to give it a rustic look, as pictured below.
Now, it’s time for the last step – to add your metal die-cut word! I chose “welcome” to put on mine. The package comes with “welcome”, “harvest”, and “thankful” – all great options for a fall wreath.
Hot glue the word on, making sure to hold it down tightly while the glue dries. Since there are only a few spots where the glue will meet the wreath, you’ll need to really make sure it’s secure.
Ta-daaaa! Your fall wreath is done!
I was really happy with the way mine turned out. I didn’t have very high expectations when I started it, to be honest. But, as I sit here with my fall wreath hanging on my door, I’m pretty glad it turned out how it did! It adds a nice touch to my front door 🙂
We have more fall DIY tutorials and printables here – – –
We love to hear what you’ve made from our site, so be sure to share with us what projects, meals, decor pieces, etc. you’ve made from here and how they turned out 🙂























cialis daily dosage: TadalAccess – cialis 5mg coupon
cialis generic cost: TadalAccess – buy cialis no prescription overnight
what are the side effect of cialis: cialis manufacturer – buying cialis
is there a generic equivalent for cialis: TadalAccess – tadalafil brand name
tadalafil pulmonary hypertension: what does cialis do – cialis headache
cialis ingredients: TadalAccess – buy cialis canada
how to buy tadalafil: ambrisentan and tadalafil combination brands – cialis for performance anxiety
cialis blood pressure: Tadal Access – cialis 40 mg
generic tadalafil 40 mg: cialis tablets – cialis generic cost
buy cialis online from canada [url=https://tadalaccess.com/#]cheap generic cialis canada[/url] buy cialis generic online 10 mg
cialis online pharmacy australia: Tadal Access – walgreens cialis prices
pastillas cialis: tadalafil canada is it safe – buying cialis online
order generic cialis: tadalafil citrate research chemical – cialis available in walgreens over counter??
cialis professional 20 lowest price: TadalAccess – what is cialis for
cialis free trial voucher [url=https://tadalaccess.com/#]Tadal Access[/url] what doe cialis look like
cialis black 800 to buy in the uk one pill: TadalAccess – cialis free trial canada
cialis tadalafil 5mg once a day: cialis prescription online – generic cialis from india
cialis daily dose: Tadal Access – buy cialis toronto
cialis buy online canada: TadalAccess – cialis coupon 2019
generic cialis: u.s. pharmacy prices for cialis – buy cialis/canada
where can i buy generic clomid: where buy generic clomid for sale – cost of clomid online
Amo Health Care: amoxicillin brand name – Amo Health Care
prednisone 300mg: cost of prednisone in canada – PredniHealth
how can i get generic clomid for sale: cheap clomid tablets – clomid cost
PredniHealth [url=https://prednihealth.shop/#]PredniHealth[/url] prednisone 1 mg daily
prednisone 10 tablet: prednisone cream rx – PredniHealth
PredniHealth: prednisone oral – PredniHealth
clomid sale: can i order generic clomid pills – can i order clomid without prescription
can i purchase generic clomid: buying cheap clomid without insurance – where buy clomid prices
how to get clomid for sale: Clom Health – can you get cheap clomid prices
how can i order prednisone: can you buy prednisone over the counter in mexico – cost of prednisone 10mg tablets
amoxicillin pills 500 mg: how to get amoxicillin – amoxicillin 500mg capsules antibiotic
where buy generic clomid no prescription: Clom Health – where to get clomid without insurance
verified Modafinil vendors: verified Modafinil vendors – modafinil 2025
secure checkout Viagra: order Viagra discreetly – cheap Viagra online
buy generic Viagra online [url=http://maxviagramd.com/#]fast Viagra delivery[/url] cheap Viagra online
generic tadalafil: buy generic Cialis online – Cialis without prescription
verified Modafinil vendors: buy modafinil online – Modafinil for sale
cheap Viagra online: cheap Viagra online – legit Viagra online
secure checkout Viagra: discreet shipping – secure checkout Viagra
cheap Viagra online: legit Viagra online – best price for Viagra
Viagra without prescription: same-day Viagra shipping – buy generic Viagra online
modafinil pharmacy: purchase Modafinil without prescription – modafinil pharmacy
modafinil legality: modafinil legality – modafinil pharmacy
buy modafinil online: modafinil 2025 – verified Modafinil vendors
FDA approved generic Cialis: discreet shipping ED pills – buy generic Cialis online
discreet shipping ED pills: Cialis without prescription – cheap Cialis online
Viagra without prescription: safe online pharmacy – no doctor visit required
reliable online pharmacy Cialis: secure checkout ED drugs – generic tadalafil
safe online pharmacy: trusted Viagra suppliers – secure checkout Viagra
reliable online pharmacy Cialis: best price Cialis tablets – order Cialis online no prescription
http://maxviagramd.com/# safe online pharmacy
buy generic Cialis online: cheap Cialis online – Cialis without prescription
secure checkout Viagra: buy generic Viagra online – fast Viagra delivery
order Cialis online no prescription: online Cialis pharmacy – FDA approved generic Cialis
modafinil pharmacy: verified Modafinil vendors – modafinil legality
modafinil legality [url=https://modafinilmd.store/#]buy modafinil online[/url] buy modafinil online
best price Cialis tablets: affordable ED medication – Cialis without prescription
https://modafinilmd.store/# Modafinil for sale
doctor-reviewed advice [url=http://modafinilmd.store/#]buy modafinil online[/url] Modafinil for sale
modafinil legality: buy modafinil online – modafinil legality
https://modafinilmd.store/# modafinil pharmacy
secure checkout Viagra [url=https://maxviagramd.com/#]cheap Viagra online[/url] no doctor visit required
https://modafinilmd.store/# legal Modafinil purchase
pinup az [url=https://pinupaz.top/#]pin up az[/url] pin up casino
http://vavadavhod.tech/# вавада зеркало
pin up casino [url=http://pinupaz.top/#]pin-up[/url] pin-up casino giris
https://pinupaz.top/# pin up
вавада [url=https://vavadavhod.tech/#]vavada[/url] vavada вход
пин ап казино: пинап казино – пинап казино
http://pinuprus.pro/# пин ап казино
вавада казино [url=http://vavadavhod.tech/#]vavada casino[/url] vavada casino
пинап казино: пин ап казино – pin up вход
vavada вход [url=http://vavadavhod.tech/#]вавада официальный сайт[/url] вавада зеркало
http://pinuprus.pro/# pin up вход
вавада казино: vavada вход – вавада
vavada casino [url=http://vavadavhod.tech/#]вавада официальный сайт[/url] vavada вход
pinup az [url=http://pinupaz.top/#]pin-up casino giris[/url] pin-up casino giris
пин ап казино: пин ап казино официальный сайт – пин ап вход
пин ап вход [url=https://pinuprus.pro/#]пин ап зеркало[/url] пинап казино
http://vavadavhod.tech/# vavada casino
pin up az [url=https://pinupaz.top/#]pin up azerbaycan[/url] pinup az
vavada вход [url=http://vavadavhod.tech/#]вавада зеркало[/url] вавада зеркало
вавада: вавада официальный сайт – вавада
pin up azerbaycan [url=https://pinupaz.top/#]pin up azerbaycan[/url] pin up casino
пин ап вход: пин ап казино официальный сайт – пин ап казино
pin up вход: пинап казино – пин ап зеркало
pin-up casino giris: pin up casino – pin up azerbaycan
http://vavadavhod.tech/# vavada вход
pin up вход [url=https://pinuprus.pro/#]пинап казино[/url] пин ап казино официальный сайт
пин ап казино: пин ап казино – пинап казино
vavada casino: вавада зеркало – vavada
пинап казино: пинап казино – пин ап зеркало
pin up az [url=https://pinupaz.top/#]pin up azerbaycan[/url] pin up casino
вавада зеркало: vavada – vavada casino
пин ап казино [url=https://pinuprus.pro/#]пин ап зеркало[/url] пинап казино
pin up az [url=https://pinupaz.top/#]pin up azerbaycan[/url] pin up azerbaycan
pin-up: pinup az – pin up az
пин ап зеркало: пинап казино – пин ап зеркало
пин ап казино официальный сайт: пин ап казино официальный сайт – пинап казино
pin-up [url=https://pinupaz.top/#]pin up casino[/url] pin-up casino giris
http://vavadavhod.tech/# вавада зеркало
пинап казино [url=http://pinuprus.pro/#]пин ап зеркало[/url] пин ап вход
pinup az [url=http://pinupaz.top/#]pinup az[/url] pin up azerbaycan
pinup az: pin up az – pin up
vavada вход [url=http://vavadavhod.tech/#]вавада казино[/url] vavada
pin up casino [url=https://pinupaz.top/#]pinup az[/url] pin up azerbaycan
pin up azerbaycan: pin up azerbaycan – pinup az
пин ап казино официальный сайт [url=http://pinuprus.pro/#]pin up вход[/url] пинап казино
пин ап казино: пин ап казино официальный сайт – pin up вход
вавада официальный сайт: vavada – vavada
вавада [url=http://vavadavhod.tech/#]вавада официальный сайт[/url] vavada вход
pin up: pin up azerbaycan – pinup az
vavada вход [url=https://vavadavhod.tech/#]vavada[/url] вавада
пин ап казино официальный сайт [url=http://pinuprus.pro/#]пин ап казино[/url] пин ап казино
пин ап казино официальный сайт: пинап казино – пин ап казино
pin up [url=http://pinupaz.top/#]pin up azerbaycan[/url] pin-up casino giris
thecanadianpharmacy: Express Rx Canada – my canadian pharmacy review
MedicineFromIndia [url=https://medicinefromindia.shop/#]indian pharmacy online shopping[/url] india pharmacy
Medicine From India [url=https://medicinefromindia.shop/#]indian pharmacy online[/url] indian pharmacy online shopping
canadian pharmacy 1 internet online drugstore: Generic drugs from Canada – canadian pharmacies that deliver to the us
indian pharmacy [url=http://medicinefromindia.com/#]Medicine From India[/url] Medicine From India
indian pharmacy online: indian pharmacy online – Medicine From India
Medicine From India: Medicine From India – online pharmacy india
canadian drugs [url=http://expressrxcanada.com/#]Generic drugs from Canada[/url] precription drugs from canada
Medicine From India [url=http://medicinefromindia.com/#]medicine courier from India to USA[/url] indian pharmacy online
top 10 pharmacies in india: indian pharmacy online – medicine courier from India to USA
Online medicine home delivery: medicine courier from India to USA – Medicine From India
trustworthy canadian pharmacy [url=https://expressrxcanada.shop/#]Buy medicine from Canada[/url] best canadian pharmacy
Medicine From India: indian pharmacy online – indian pharmacy online shopping
indian pharmacy online shopping [url=https://medicinefromindia.com/#]indian pharmacy online shopping[/url] Medicine From India
pharmacie en ligne france livraison belgique: Meilleure pharmacie en ligne – pharmacie en ligne livraison europe pharmafst.com
Achat Cialis en ligne fiable: Tadalafil achat en ligne – Acheter Viagra Cialis sans ordonnance tadalmed.shop
Kamagra pharmacie en ligne [url=https://kamagraprix.com/#]Kamagra Oral Jelly pas cher[/url] Kamagra Oral Jelly pas cher
acheter kamagra site fiable: acheter kamagra site fiable – kamagra pas cher
Tadalafil 20 mg prix sans ordonnance: Tadalafil sans ordonnance en ligne – Cialis sans ordonnance 24h tadalmed.shop
Achetez vos kamagra medicaments: achat kamagra – Kamagra pharmacie en ligne
Pharmacie sans ordonnance [url=http://pharmafst.com/#]Pharmacies en ligne certifiees[/url] Achat mГ©dicament en ligne fiable pharmafst.shop
kamagra 100mg prix: Kamagra Commander maintenant – achat kamagra
Cialis generique prix [url=https://tadalmed.shop/#]Cialis sans ordonnance pas cher[/url] Achat Cialis en ligne fiable tadalmed.com
pharmacie en ligne france fiable [url=http://pharmafst.com/#]pharmacie en ligne sans ordonnance[/url] vente de mГ©dicament en ligne pharmafst.shop
https://pharmafst.com/# Pharmacie Internationale en ligne
Acheter Cialis [url=https://tadalmed.com/#]cialis generique[/url] Pharmacie en ligne Cialis sans ordonnance tadalmed.com
http://tadalmed.com/# Cialis sans ordonnance 24h
pharmacies en ligne certifiГ©es: Pharmacie en ligne livraison Europe – Pharmacie en ligne livraison Europe pharmafst.com
pharmacie en ligne avec ordonnance [url=https://pharmafst.shop/#]pharmacie en ligne pas cher[/url] pharmacie en ligne livraison europe pharmafst.shop
kamagra livraison 24h [url=http://kamagraprix.com/#]kamagra gel[/url] Kamagra Commander maintenant
https://tadalmed.com/# Tadalafil 20 mg prix sans ordonnance
pharmacie en ligne pas cher [url=http://pharmafst.com/#]Medicaments en ligne livres en 24h[/url] pharmacie en ligne france pas cher pharmafst.shop
Cialis sans ordonnance pas cher [url=http://tadalmed.com/#]Cialis en ligne[/url] Cialis en ligne tadalmed.com
Pharmacie en ligne Cialis sans ordonnance: Pharmacie en ligne Cialis sans ordonnance – Cialis sans ordonnance 24h tadalmed.shop
Achetez vos kamagra medicaments: kamagra pas cher – kamagra pas cher
https://tadalmed.shop/# Tadalafil achat en ligne
Cialis sans ordonnance 24h [url=https://tadalmed.shop/#]Cialis sans ordonnance 24h[/url] Acheter Viagra Cialis sans ordonnance tadalmed.com
Tadalafil 20 mg prix en pharmacie: cialis sans ordonnance – Acheter Viagra Cialis sans ordonnance tadalmed.shop
http://pharmafst.com/# п»їpharmacie en ligne france
kamagra oral jelly: kamagra livraison 24h – acheter kamagra site fiable
https://kamagraprix.com/# Acheter Kamagra site fiable
Achetez vos kamagra medicaments: kamagra 100mg prix – Kamagra Oral Jelly pas cher
https://pharmafst.shop/# pharmacie en ligne
Acheter Viagra Cialis sans ordonnance: Acheter Viagra Cialis sans ordonnance – Cialis en ligne tadalmed.shop
https://tadalmed.shop/# Cialis sans ordonnance 24h
Tadalafil achat en ligne: Achat Cialis en ligne fiable – Tadalafil 20 mg prix en pharmacie tadalmed.shop
https://tadalmed.com/# Pharmacie en ligne Cialis sans ordonnance
pharmacie en ligne france livraison belgique: Meilleure pharmacie en ligne – pharmacie en ligne fiable pharmafst.com
https://tadalmed.shop/# Acheter Viagra Cialis sans ordonnance
acheter mГ©dicament en ligne sans ordonnance: pharmacie en ligne pas cher – Pharmacie Internationale en ligne pharmafst.com
https://kamagraprix.com/# achat kamagra
Kamagra Oral Jelly pas cher: achat kamagra – kamagra 100mg prix
https://olympecasino.pro/# olympe casino en ligne
olympe casino en ligne: olympe casino cresus – olympe casino avis
casino olympe: olympe – olympe casino avis
olympe casino cresus: olympe casino – olympe casino avis
olympe casino cresus: olympe – olympe casino cresus
olympe casino en ligne: olympe casino avis – olympe
olympe casino en ligne: olympe casino en ligne – casino olympe
olympe casino: olympe – olympe casino avis
[url=https://olympecasino.pro/#]olympe casino[/url] olympe casino en ligne
olympe: olympe casino – olympe casino en ligne
https://olympecasino.pro/# olympe
casino olympe: olympe casino – casino olympe
olympe: olympe casino en ligne – olympe casino cresus
casino olympe: olympe casino en ligne – casino olympe
casino olympe: olympe – olympe casino avis
olympe casino: olympe casino avis – olympe casino avis
olympe casino avis: olympe casino avis – olympe casino cresus
olympe casino avis: casino olympe – olympe casino
casino olympe: olympe casino – casino olympe
olympe casino avis: olympe casino cresus – casino olympe
olympe casino en ligne: olympe casino cresus – olympe
olympe casino avis: olympe casino cresus – olympe casino avis
https://olympecasino.pro/# olympe casino cresus
olympe casino en ligne: olympe casino cresus – olympe casino cresus
casino olympe: olympe casino en ligne – casino olympe
olympe casino en ligne: olympe casino cresus – olympe casino avis
https://olympecasino.pro/# olympe
olympe casino: olympe casino cresus – olympe casino cresus
USACanadaPharm [url=https://usacanadapharm.shop/#]usa canada pharm[/url] USACanadaPharm
https://usacanadapharm.com/# canadian drug stores
canadian pharmacy service: usa canada pharm – USACanadaPharm
http://usacanadapharm.com/# usa canada pharm
canadian drug stores: reliable canadian pharmacy – usa canada pharm
canadapharmacyonline com [url=http://usacanadapharm.com/#]canada drugs online review[/url] USACanadaPharm
https://usacanadapharm.com/# USACanadaPharm
usa canada pharm: best canadian pharmacy to buy from – USACanadaPharm
certified canadian international pharmacy https://usacanadapharm.shop/# USACanadaPharm
canadian drug pharmacy
https://usacanadapharm.shop/# medication canadian pharmacy
usa canada pharm [url=http://usacanadapharm.com/#]canada cloud pharmacy[/url] best mail order pharmacy canada
http://usacanadapharm.com/# canadian pharmacy ed medications
certified canadian international pharmacy: usa canada pharm – usa canada pharm
https://usacanadapharm.shop/# canadian pharmacy phone number
usa canada pharm [url=http://usacanadapharm.com/#]USACanadaPharm[/url] canadian pharmacy 24
safe canadian pharmacy: drugs from canada – USACanadaPharm
https://usacanadapharm.com/# usa canada pharm
usa canada pharm: legit canadian pharmacy – canadian drugs online
usa canada pharm: buying drugs from canada – drugs from canada
onlinecanadianpharmacy [url=http://usacanadapharm.com/#]usa canada pharm[/url] canadian pharmacy no scripts
https://usacanadapharm.com/# canada rx pharmacy
ed meds online canada: usa canada pharm – usa canada pharm
USACanadaPharm: online canadian pharmacy – usa canada pharm
http://usacanadapharm.com/# usa canada pharm
pharmacy com canada [url=https://usacanadapharm.shop/#]USACanadaPharm[/url] usa canada pharm
canada discount pharmacy: USACanadaPharm – buying drugs from canada
https://usacanadapharm.shop/# usa canada pharm
USACanadaPharm: USACanadaPharm – USACanadaPharm
reputable indian pharmacies: UsaIndiaPharm – indianpharmacy com
http://usaindiapharm.com/# indian pharmacies safe
UsaIndiaPharm: india online pharmacy – USA India Pharm
USA India Pharm: reputable indian pharmacies – Online medicine order
UsaIndiaPharm: UsaIndiaPharm – USA India Pharm
https://usaindiapharm.com/# USA India Pharm
USA India Pharm: online pharmacy india – UsaIndiaPharm
top online pharmacy india [url=http://usaindiapharm.com/#]Online medicine order[/url] UsaIndiaPharm
UsaIndiaPharm: cheapest online pharmacy india – UsaIndiaPharm
UsaIndiaPharm: Online medicine home delivery – cheapest online pharmacy india
india pharmacy mail order: india pharmacy mail order – Online medicine home delivery
http://usaindiapharm.com/# UsaIndiaPharm
best online pharmacy india: UsaIndiaPharm – pharmacy website india
UsaIndiaPharm: USA India Pharm – best india pharmacy
USA India Pharm [url=https://usaindiapharm.shop/#]pharmacy website india[/url] UsaIndiaPharm
UsaIndiaPharm: USA India Pharm – USA India Pharm
https://usaindiapharm.com/# indian pharmacy paypal
pharmacy website india: UsaIndiaPharm – UsaIndiaPharm
top 10 online pharmacy in india: world pharmacy india – USA India Pharm
http://usaindiapharm.com/# Online medicine home delivery
best online pharmacy india: indian pharmacies safe – п»їlegitimate online pharmacies india
USA India Pharm [url=https://usaindiapharm.com/#]UsaIndiaPharm[/url] pharmacy website india
india pharmacy: pharmacy website india – USA India Pharm
https://usaindiapharm.shop/# indian pharmacy online
UsaIndiaPharm: reputable indian pharmacies – buy medicines online in india
buy medicines online in india: best india pharmacy – buy prescription drugs from india
http://usaindiapharm.com/# п»їlegitimate online pharmacies india
UsaIndiaPharm: USA India Pharm – UsaIndiaPharm
https://usaindiapharm.com/# world pharmacy india
Online medicine order: indian pharmacy online – USA India Pharm
indian pharmacy paypal [url=https://usaindiapharm.com/#]buy prescription drugs from india[/url] USA India Pharm
UsaIndiaPharm: UsaIndiaPharm – pharmacy website india
http://usaindiapharm.com/# UsaIndiaPharm
cheapest online pharmacy india: USA India Pharm – Online medicine order
UsaIndiaPharm: USA India Pharm – USA India Pharm
http://usaindiapharm.com/# USA India Pharm
п»їlegitimate online pharmacies india [url=https://usaindiapharm.shop/#]п»їlegitimate online pharmacies india[/url] USA India Pharm
UsaIndiaPharm: USA India Pharm – UsaIndiaPharm
https://usaindiapharm.com/# UsaIndiaPharm
USA India Pharm: UsaIndiaPharm – buy medicines online in india
online pharmacy india: UsaIndiaPharm – Online medicine order
http://usaindiapharm.com/# cheapest online pharmacy india
certified Mexican pharmacy [url=https://usmexpharm.shop/#]usa mexico pharmacy[/url] USMexPharm
mexico drug stores pharmacies: mexican pharmacy – Us Mex Pharm
usa mexico pharmacy: USMexPharm – Mexican pharmacy ship to USA
medicine in mexico pharmacies: certified Mexican pharmacy – Mexican pharmacy ship to USA
http://usmexpharm.com/# USMexPharm
certified Mexican pharmacy [url=https://usmexpharm.shop/#]USMexPharm[/url] Mexican pharmacy ship to USA
UsMex Pharm: UsMex Pharm – Us Mex Pharm
Mexican pharmacy ship to USA: UsMex Pharm – UsMex Pharm
http://usmexpharm.com/# usa mexico pharmacy
Mexican pharmacy ship to USA: certified Mexican pharmacy – Us Mex Pharm
UsMex Pharm: Mexican pharmacy ship to USA – UsMex Pharm
UsMex Pharm: Mexican pharmacy ship to USA – UsMex Pharm
http://usmexpharm.com/# UsMex Pharm
medication from mexico pharmacy: certified Mexican pharmacy – mexican pharmacy
Mexican pharmacy ship to USA [url=https://usmexpharm.com/#]UsMex Pharm[/url] USMexPharm
https://usmexpharm.com/# usa mexico pharmacy
usa mexico pharmacy: pharmacies in mexico that ship to usa – Mexican pharmacy ship to USA
usa mexico pharmacy [url=https://usmexpharm.com/#]certified Mexican pharmacy[/url] UsMex Pharm
https://usmexpharm.com/# mexican pharmacy
UsMex Pharm: buying from online mexican pharmacy – usa mexico pharmacy
mexico drug stores pharmacies: mexico pharmacies prescription drugs – usa mexico pharmacy
http://usmexpharm.com/# mexican pharmacy
UsMex Pharm [url=http://usmexpharm.com/#]certified Mexican pharmacy[/url] medicine in mexico pharmacies
certified Mexican pharmacy: usa mexico pharmacy – mexican mail order pharmacies
certified Mexican pharmacy: UsMex Pharm – Mexican pharmacy ship to USA
https://usmexpharm.com/# certified Mexican pharmacy
sweet bonanza siteleri: sweet bonanza giris – sweet bonanza demo sweetbonanza1st.shop
bahis siteleri slot oyunlarД± [url=http://casibom1st.com/#]casibom[/url] superbeting casibom1st.shop
gerГ§ek paralД± slot uygulamalarД±: casibom resmi – siteler bahis casibom1st.com
http://sweetbonanza1st.com/# sweet bonanza slot
guvenilir casino siteleri: pronet giriЕџ – casino siteleri casinositeleri1st.com
sweet bonanza oyna: sweet bonanza slot – sweet bonanza yorumlar sweetbonanza1st.shop
sweet bonanza siteleri [url=https://sweetbonanza1st.shop/#]sweet bonanza siteleri[/url] sweet bonanza giris sweetbonanza1st.com
casino oyna: casibom guncel giris – como bakery yorumlarД± casibom1st.com
http://casinositeleri1st.com/# slot casino siteleri
sweet bonanza yorumlar: sweet bonanza yorumlar – sweet bonanza 1st sweetbonanza1st.shop
sweet bonanza demo [url=https://sweetbonanza1st.com/#]sweet bonanza giris[/url] sweet bonanza slot sweetbonanza1st.com
casino siteleri: guvenilir casino siteleri – casino siteleri casinositeleri1st.com
sweet bonanza oyna: sweet bonanza oyna – sweet bonanza slot sweetbonanza1st.shop
guvenilir casino siteleri: slot casino siteleri – deneme bonusu veren siteler casinositeleri1st.com
sweet bonanza oyna [url=https://sweetbonanza1st.com/#]sweet bonanza oyna[/url] sweet bonanza siteleri sweetbonanza1st.com
sweet bonanza siteleri: sweet bonanza yorumlar – sweet bonanza siteleri sweetbonanza1st.shop
siteler bahis [url=https://casibom1st.shop/#]casibom[/url] 100 tl bonus veren bahis siteleri casibom1st.shop
https://casinositeleri1st.shop/# casino siteleri 2025
gГјvenilir illegal bahis siteleri: lisansl? casino siteleri – slot casino siteleri casinositeleri1st.com
dГјnyanД±n en iyi bahis siteleri [url=https://casibom1st.com/#]casibom giris adresi[/url] en iyi casino oyunlarД± casibom1st.shop
casino siteleri: casino siteleri – orjinal siteler casinositeleri1st.com
gГјvenilir casino siteleri: lisansl? casino siteleri – deneme bonus siteler casinositeleri1st.com
https://casibom1st.com/# bet casino
gГјvenilir bahis siteleri 2024: casibom 1st – bonus slot casibom1st.com
Pred Pharm Net: Pred Pharm Net – prednisone brand name india
AmOnlinePharm [url=http://amonlinepharm.com/#]AmOnlinePharm[/url] where to buy amoxicillin over the counter
amoxicillin 500 mg where to buy: AmOnlinePharm – AmOnlinePharm
https://predpharmnet.shop/# generic prednisone for sale
prednisone in canada: Pred Pharm Net – 5mg prednisone
buy cheap lisinopril 40 mg no prescription: Lisin Express – Lisin Express
Pred Pharm Net: can i buy prednisone online without prescription – Pred Pharm Net
https://clomfastpharm.shop/# Clom Fast Pharm
can i purchase amoxicillin online: amoxicillin 500mg buy online canada – amoxicillin azithromycin
ZithPharmOnline [url=https://zithpharmonline.shop/#]zithromax prescription in canada[/url] ZithPharmOnline
Clom Fast Pharm: Clom Fast Pharm – Clom Fast Pharm
https://zithpharmonline.shop/# zithromax 500 price
where to get cheap clomid prices: Clom Fast Pharm – can you get generic clomid pills
can i purchase generic clomid pills: can you get clomid for sale – can i order clomid for sale
https://zithpharmonline.shop/# ZithPharmOnline
prednisone 20 mg in india: Pred Pharm Net – Pred Pharm Net
where to buy generic clomid pills: can i get generic clomid without prescription – cost clomid without insurance
https://predpharmnet.com/# prednisone 5mg coupon
prednisone 20mg prescription cost: Pred Pharm Net – Pred Pharm Net
ZithPharmOnline: generic zithromax medicine – ZithPharmOnline
zithromax 500mg price in india [url=http://zithpharmonline.com/#]buy zithromax without prescription online[/url] ZithPharmOnline
amoxicillin 500mg capsule buy online: how much is amoxicillin – amoxil generic
https://predpharmnet.com/# prednisone 2 mg daily
Pred Pharm Net: Pred Pharm Net – Pred Pharm Net
AmOnlinePharm: AmOnlinePharm – can you buy amoxicillin over the counter canada
https://zithpharmonline.com/# zithromax without prescription
no prescription lisinopril [url=https://lisinexpress.com/#]lisinopril 40 mg brand name[/url] generic lisinopril 3973
amoxicillin 500 mg capsule: AmOnlinePharm – AmOnlinePharm
https://lisinexpress.com/# Lisin Express
ZithPharmOnline: ZithPharmOnline – ZithPharmOnline
prednisone 2 mg daily [url=https://predpharmnet.shop/#]Pred Pharm Net[/url] prednisone 2 mg
https://zithpharmonline.shop/# where to get zithromax over the counter
prednisone 20 mg without prescription: prednisone 60 mg – Pred Pharm Net
http://amonlinepharm.com/# AmOnlinePharm
amoxicillin medicine: amoxicillin price without insurance – AmOnlinePharm
http://agbmexicopharm.com/# pharmacies in mexico that ship to usa
canada pharmacy reviews: go canada pharm – canadian pharmacy 24
mexican pharmaceuticals online: medication from mexico pharmacy – Agb Mexico Pharm
mexican pharmaceuticals online: mexico pharmacies prescription drugs – mexico pharmacies prescription drugs
onlinepharmaciescanada com [url=https://gocanadapharm.shop/#]go canada pharm[/url] best online canadian pharmacy
https://wwwindiapharm.com/# cheapest online pharmacy india
top online pharmacy india: www india pharm – www india pharm
canadian compounding pharmacy: canadian pharmacy reviews – adderall canadian pharmacy
https://gocanadapharm.com/# medication canadian pharmacy
77 canadian pharmacy: best canadian pharmacy – canadian pharmacy 24 com
recommended canadian pharmacies [url=https://gocanadapharm.shop/#]GoCanadaPharm[/url] canadian online drugstore
india pharmacy mail order: www india pharm – reputable indian pharmacies
http://wwwindiapharm.com/# world pharmacy india
india online pharmacy: www india pharm – www india pharm
http://agbmexicopharm.com/# п»їbest mexican online pharmacies
canada pharmacy world: GoCanadaPharm – canadian pharmacy world
canadian pharmacy 24 com: 77 canadian pharmacy – best canadian online pharmacy
http://wwwindiapharm.com/# www india pharm
indian pharmacy paypal: www india pharm – www india pharm
www india pharm: reputable indian pharmacies – mail order pharmacy india
canadian family pharmacy [url=https://gocanadapharm.shop/#]legal canadian pharmacy online[/url] best canadian online pharmacy
pharmacies in canada that ship to the us: online canadian pharmacy reviews – canadian online pharmacy
https://agbmexicopharm.com/# purple pharmacy mexico price list
buy medicines online in india: buy medicines online in india – www india pharm
buy prescription drugs from india: www india pharm – indianpharmacy com
buy prescription drugs from india: www india pharm – online pharmacy india
https://wwwindiapharm.shop/# best india pharmacy
vipps approved canadian online pharmacy [url=https://gocanadapharm.com/#]GoCanadaPharm[/url] cheapest pharmacy canada
www india pharm: www india pharm – buy prescription drugs from india
https://agbmexicopharm.shop/# reputable mexican pharmacies online
www india pharm: indian pharmacies safe – www india pharm
Kamagra kaufen ohne Rezept: kamagra – Kamagra Original
Apoteket online: apotek pa nett – Apoteket online
https://apotekonlinerecept.shop/# apotek online recept
Kamagra Original: Kamagra kaufen – Kamagra kaufen ohne Rezept
apotek pa nett: Apoteket online – Apotek hemleverans recept
ApotheekMax [url=https://apotheekmax.com/#]Online apotheek Nederland zonder recept[/url] online apotheek
https://apotheekmax.com/# Online apotheek Nederland zonder recept
Apotheek online bestellen: Online apotheek Nederland zonder recept – de online drogist kortingscode
https://kamagrapotenzmittel.com/# Kamagra kaufen
Online apotheek Nederland met recept: Online apotheek Nederland zonder recept – Online apotheek Nederland zonder recept
http://kamagrapotenzmittel.com/# Kamagra online bestellen
de online drogist kortingscode [url=https://apotheekmax.shop/#]online apotheek[/url] Beste online drogist
kamagra: Kamagra Oral Jelly kaufen – Kamagra kaufen ohne Rezept
http://apotekonlinerecept.com/# apotek online recept
de online drogist kortingscode: Apotheek Max – Online apotheek Nederland zonder recept
http://apotheekmax.com/# Online apotheek Nederland met recept
Apoteket online [url=https://apotekonlinerecept.shop/#]Apotek hemleverans recept[/url] Apotek hemleverans recept
Kamagra Oral Jelly kaufen: kamagra – Kamagra Original
https://kamagrapotenzmittel.shop/# Kamagra online bestellen
https://kamagrapotenzmittel.shop/# kamagra
Kamagra Oral Jelly: Kamagra online bestellen – Kamagra Oral Jelly kaufen
Kamagra Oral Jelly kaufen [url=https://kamagrapotenzmittel.shop/#]Kamagra Oral Jelly[/url] Kamagra Gel
Apotheek online bestellen: Apotheek online bestellen – Apotheek Max
https://kamagrapotenzmittel.shop/# Kamagra Oral Jelly kaufen
apotek online: apotek online recept – apotek online
https://kamagrapotenzmittel.shop/# Kamagra Oral Jelly kaufen
Kamagra kaufen [url=https://kamagrapotenzmittel.com/#]Kamagra Gel[/url] Kamagra Oral Jelly kaufen
https://apotekonlinerecept.com/# apotek online recept
Apoteket online: Apotek hemleverans recept – apotek pa nett
https://apotekonlinerecept.shop/# Apotek hemleverans idag
apotek pa nett: Apoteket online – apotek online recept
apotek pa nett [url=https://apotekonlinerecept.com/#]Apotek hemleverans idag[/url] Apoteket online
https://apotekonlinerecept.shop/# apotek pa nett
apotek online recept: apotek pa nett – Apotek hemleverans idag
pinup 2025 – пин ап казино официальный сайт
пинап казино – пин ап
Tadalafil Easy Buy [url=http://tadalafileasybuy.com/#]cialis without a doctor prescription[/url] cialis without a doctor prescription
пин ап зеркало – пин ап казино
пин ап вход – пин ап казино официальный сайт
Officiele Kamagra van Nederland [url=https://kamagrakopen.pro/#]Kamagra Kopen[/url] kamagra pillen kopen
пин ап вход: https://pinupkz.life/
пин ап вход – пин ап казино
kamagra 100mg kopen [url=https://kamagrakopen.pro/#]kamagra pillen kopen[/url] kamagra gel kopen
пин ап – пин ап
пин ап казино зеркало – пин ап казино зеркало
kamagra jelly kopen [url=https://kamagrakopen.pro/#]kamagra pillen kopen[/url] kamagra kopen nederland
https://kamagrakopen.pro/# KamagraKopen.pro
http://generic100mgeasy.com/# Generic100mgEasy
cialis without a doctor prescription: Tadalafil Easy Buy – cialis without a doctor prescription
https://kamagrakopen.pro/# kamagra gel kopen
Officiele Kamagra van Nederland [url=https://kamagrakopen.pro/#]Officiele Kamagra van Nederland[/url] kamagra kopen nederland
https://kamagrakopen.pro/# KamagraKopen.pro
sildenafil 50 mg price: Generic100mgEasy – Generic 100mg Easy
http://generic100mgeasy.com/# Generic 100mg Easy
Generic 100mg Easy: buy generic 100mg viagra online – buy generic 100mg viagra online
KamagraKopen.pro [url=https://kamagrakopen.pro/#]kamagra pillen kopen[/url] Officiele Kamagra van Nederland
https://tadalafileasybuy.shop/# Tadalafil Easy Buy
https://tadalafileasybuy.shop/# TadalafilEasyBuy.com
kamagra pillen kopen: KamagraKopen.pro – kamagra 100mg kopen
buy generic 100mg viagra online: buy generic 100mg viagra online – Generic100mgEasy
kamagra jelly kopen [url=https://kamagrakopen.pro/#]kamagra kopen nederland[/url] kamagra jelly kopen
https://kamagrakopen.pro/# Kamagra Kopen
Generic Cialis price: Tadalafil Easy Buy – cialis without a doctor prescription
https://kamagrakopen.pro/# KamagraKopen.pro
https://tadalafileasybuy.shop/# TadalafilEasyBuy.com
Tadalafil Easy Buy: cialis without a doctor prescription – Generic Cialis without a doctor prescription
buy generic 100mg viagra online [url=https://generic100mgeasy.com/#]Generic 100mg Easy[/url] Generic100mgEasy
https://tadalafileasybuy.com/# Tadalafil Easy Buy
https://kamagrakopen.pro/# Kamagra Kopen
TadalafilEasyBuy.com: TadalafilEasyBuy.com – Tadalafil Easy Buy
kamagra kopen nederland [url=https://kamagrakopen.pro/#]kamagra 100mg kopen[/url] KamagraKopen.pro
buy generic 100mg viagra online: buy generic 100mg viagra online – buy generic 100mg viagra online
http://generic100mgeasy.com/# Generic 100mg Easy
Officiele Kamagra van Nederland: kamagra 100mg kopen – KamagraKopen.pro
TadalafilEasyBuy.com [url=http://tadalafileasybuy.com/#]Tadalafil Easy Buy[/url] Tadalafil Easy Buy
https://tadalafileasybuy.shop/# TadalafilEasyBuy.com
https://mexicanpharminter.shop/# mexican drug stores online
safe canadian pharmacy: fda approved canadian online pharmacies – reliable canadian pharmacy reviews
https://mexicanpharminter.shop/# Mexican Pharm Inter
canadian pharmacy store
IndiaMedFast [url=https://indiamedfast.shop/#]online pharmacy india[/url] India Med Fast
http://mexicanpharminter.com/# buying from online mexican pharmacy
https://interpharmonline.com/# canadian online pharmacy reviews
best canadian pharmacy to buy from
reputable canadian pharmacy: InterPharmOnline.com – online canadian pharmacy
mexican pharmacy online: mexican pharmacy online order – MexicanPharmInter
http://indiamedfast.com/# lowest prescription prices online india
https://indiamedfast.com/# India Med Fast
legitimate canadian pharmacy online
https://indiamedfast.shop/# cheapest online pharmacy india
http://mexicanpharminter.com/# MexicanPharmInter
legitimate canadian pharmacy online
cheapest online pharmacy india: india online pharmacy store – order medicines online india
online pharmacy india [url=https://indiamedfast.com/#]order medicines online india[/url] order medicines online india
reliable mexican pharmacies: mexican pharmacy online order – reliable mexican pharmacies
https://interpharmonline.com/# canadian drug prices
mexican pharmacy online [url=https://mexicanpharminter.com/#]mexican drug stores online[/url] MexicanPharmInter
http://indiamedfast.com/# IndiaMedFast.com
canada rx pharmacy world: most reliable canadian online pharmacies – best canadian online pharmacy
alo 789 dang nh?p: alo 789 – alo789