

Easy DIY Headband Holder
I recently had a baby girl, so we’ve got lots and lots of bows and headbands around here! 😀 It had been 11 1/2 years since our first girl….and with 3 boys between our 2 girls, we hadn’t used baby girl headbands in a long time!
I won’t say we went crazy purchasing bows in every color, shape, and size…..butttt within a few months we had accumulated QUITE a lot of headbands and bows. ❤️
I can’t seem to pass up beautiful headbands if they’re on sale….they just look too cute on my curly-headed blonde baby! And I’m loving having a girl again, so I’m all in with the pretty things. 😆🤷♀️
I quickly realized that I needed to come up with the perfect storage solution for baby headbands and bows…..the little basket on top of her dresser just wasn’t working.
I’d dig and dig for the perfect headband, and they’d be all a mess. Plus I couldn’t see them all at a glance.
A couple weeks ago, I decided to take a walk around IKEA (my favorite place for storage solution ideas!!) to see what I could come up with for an easy and cheap DIY headband holder hack.
After a slow stroll through the store, I ended up with several items in my cart, still unsure what was the best solution for the best price. I was standing in the frames and artwork section that’s near the end of the walk-through…..then my eye caught exactly what I was looking for! And what do you know — I had the exact size rail in my cart that would work with the shelf that caught my eye.
The perfect match for a headband holder hack.
This is absolutely the best and easiest solution for organizing my daughter’s headbands, and I love it so much that I have to share with you guys!

Here’s what you need to make this easy DIY headband holder:
IKEA’s MOSSLANDA picture ledge, 21 3/4″ length
IKEA’s KUNGSFORS stainless steel rail, 22″
IKEA’s KUNGSFORS stainless steel S-hooks (as many as you’ll need)
Here’s a photo of the products I bought >>

So simple – you just need 3 things plus screws.
You’re going to attach the rail under the shelf, so make sure to get screws that will be perfect for the depth of the rod + shelf. You won’t want them to be too long or they’ll pop through the top of the shelf. You may want to run into the hardware store with these products in hand. 😉
Pre-drill holes into the picture ledge or it will be really hard to screw the rail into it. I’m speaking from experience. 😁


:: PIN FOR LATER ::

So easy! Once you’ve DIY-ed your headband holder with this fun shelf + rail hack, just attach it to the wall where you want it! I love that the picture shelf comes with little white stickers to cover the screws once it’s on the wall. 👍🏼

Hang those S-hooks and you’re ready to organize headbands!

Along with my S-hooks, I cut 2 long pieces of this pretty pink velvet ribbon I had in my craft stash. I simply took each piece (one at a time), folded it in half to make a loop, put it around the rail, and then drew the ends through the loop and pulled to secure.
This made the perfect “ribbon tail” to attach clip bows to!


❤️ How prettyyyyy with all these bows up on display, don’t you think?! ❤️


One reason I love this picture shelf + rail combo so much is that it not only organizes, but it also has that shelf for decorating!!
Here’s what I put on my baby girl’s headband shelf:

I’ve kept it simple (so far) — with a DIY “love you” wood cutout I bought at Hobby Lobby, a DIY no-cost jar for the little clips and barrettes that needed a place, and a DIY wooden block photo holder + photo.
These three things cost me *barely anything* – it’s easy (& fun!) to find ways to add on-a-budget decor to spaces like this!

This “Love you to the moon and back” wood cutout (which was something like $3??) didn’t come with the black base. I just painted a block of scrap wood I had, and then hot glued the word cutout (that I had already painted and glittered) onto it so it could stand up. Super simple.
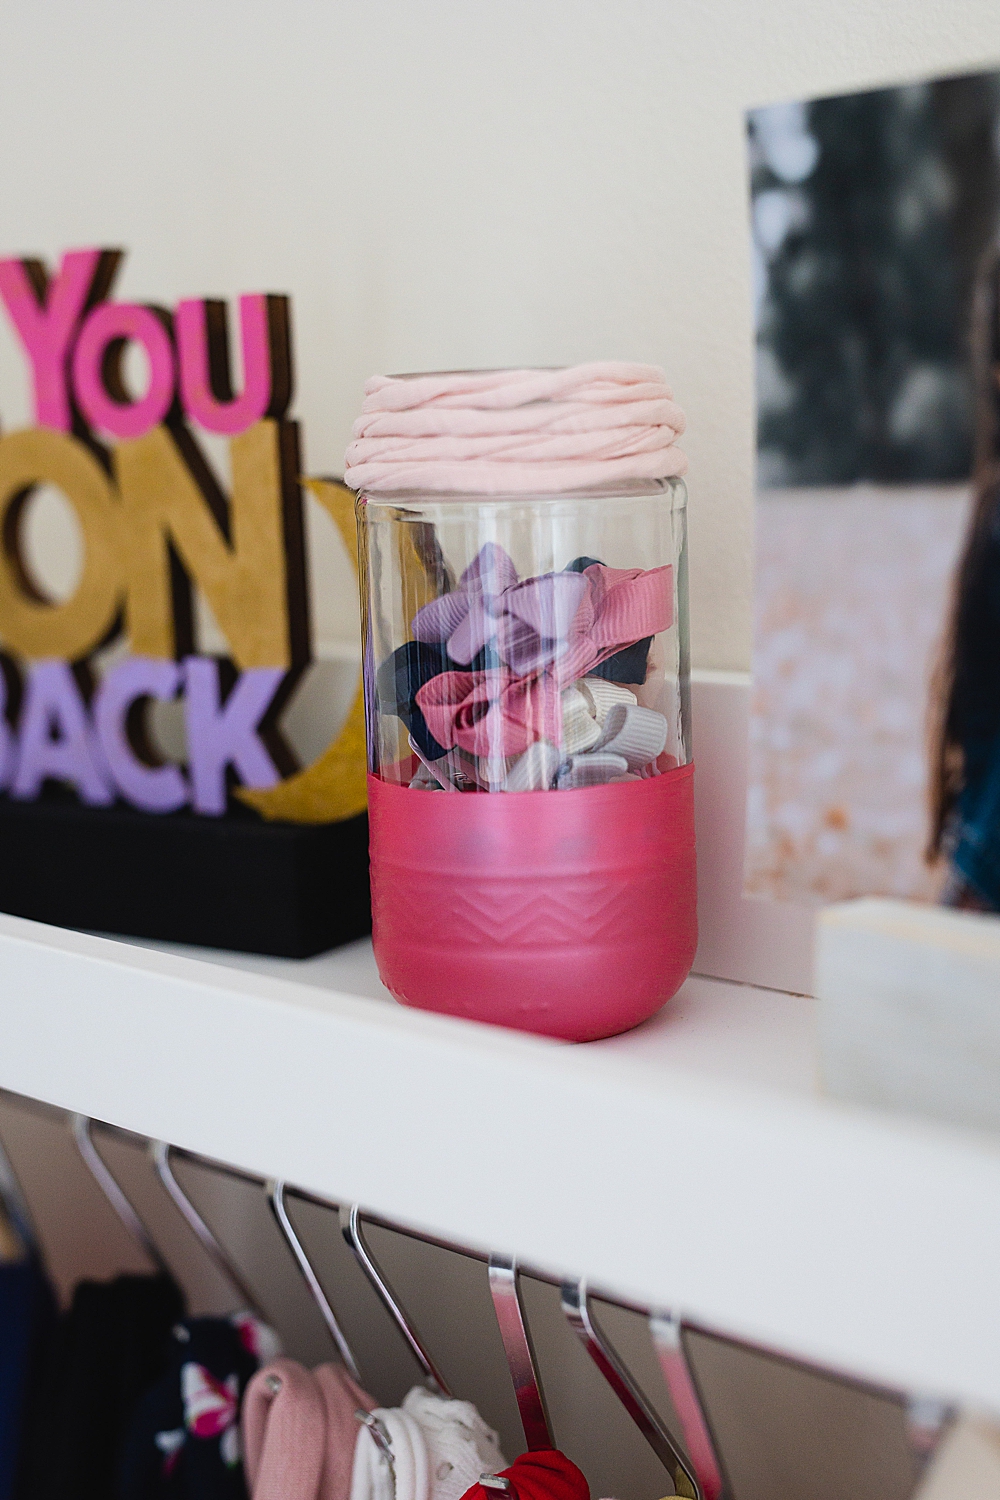
Then for the little jar, I just cleaned out a little salsa jar that was headed to the trash.
To add the pink to the base, here’s my little hack: cut the top off a balloon and stretch the big part over the jar. Tada! 30-second makeover!
Then I just glued some knit yarn around the top. Done. ✅

This easy DIY idea I got from Christine at Design for Mankind. I used a much bigger piece of wood than she’s using for her placecards, but it’s the same idea with just sawing an indent in the top with a hobby saw.
I do love the dip-dyed look she put on hers and might try that sometime! But for this one, I just did a quick coat of gray spray chalk paint, and then I gave it just a gentle rub with sandpaper to give it a weathered look.
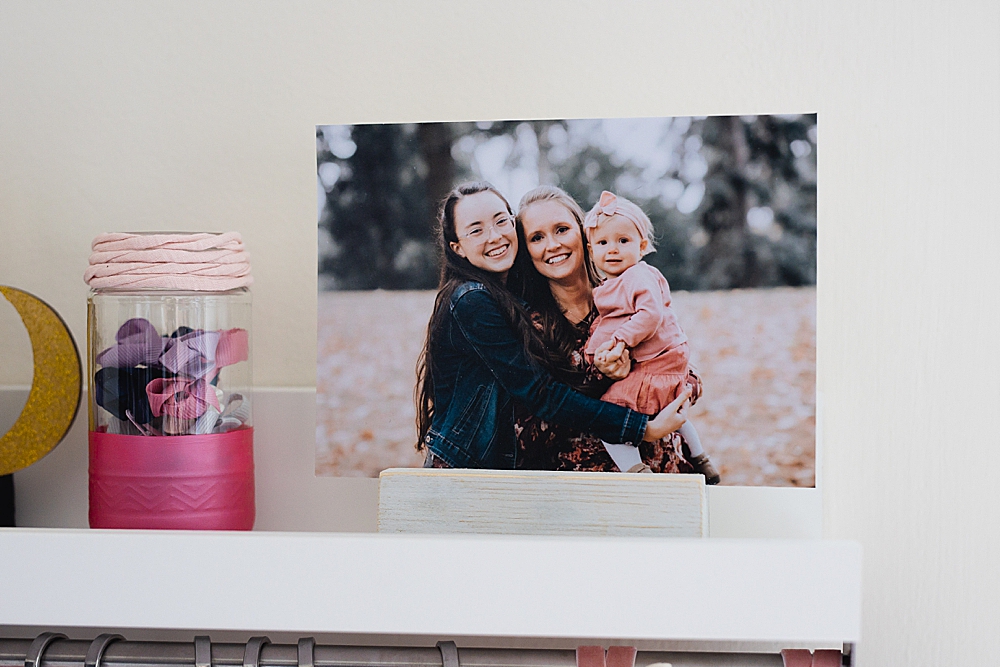
I had ordered “mounted” photos when I did my last family photos order (I prefer Mpix for my prints!), so basically they come mounted on 1/16″ matboard so that they’re sturdy and stand up well.
How cute this turned out! I’m really happy with how easy it is to grab a headband for my baby now! 😀


Every baby girl needs a couple more headbands. 🥰 While you’re feeling crafty, why not try a couple of these?! 😀

Круглозвенные цепи — это не просто элемент механики, а настоящая находка для бизнеса! Они широко используются в различных отраслях: от сельского хозяйства до строительства, обеспечивая надежную передачу усилия и долговечность – [url=https://www.t24.su/rol-podshipnikov-v-sovremennyh-mehanizmah-nauchnyy-i-tehnicheskiy-analiz/]подшипник роликовый[/url]
Когда речь идет о ремонте, выбор правильной краски — это один из самых важных этапов. Строительные краски не только придают вашему интерьеру стильный вид, но и защищают поверхности от внешних воздействий. Мы предлагаем широкий ассортимент высококачественных строительных красок, которые удовлетворят потребности как профессиональных строителей, так и домашних мастеров – [url=https://www.domashniy-comfort.ru/remont/200-steni/1659-sovremennye-lakokrasochnye-materialy-dlya-vnutrennih-rabot-tehnologii-svoystva-i-primenenie-.html]краска вгт для внутренних работ.[/url]
Лазерный уровень легко помещается в сумке и всегда под рукой, когда он вам нужен. Идеально подходит для работы как в помещении, так и на улице. – [url=http://www.realto.ru/journal/articles/nivelir-opticheskij-stroitelnyj-preimushestva-i-osobennosti-vybora/]нивелир оптический строительный купить.[/url]
В современном мире, где качество и безопасность товаров и услуг становятся все более важными, сертификация играет ключевую роль. Мы предлагаем профессиональные услуги по сертификации, которые помогут вашему бизнесу соответствовать международным стандартам и укрепить доверие клиентов. – [url=https://news.1777.ru/111119-regulyatornaya-stoimost-v-logistike-kachestva-kak-formiruetsya-cena-na-podtverzhdenie-sootvetstviya-produkcii]декларация соответствия на продукцию цена.[/url]
Уборка квартир в культурной столице! Забудьте о быте, окунитесь в свежесть. Профессионально, быстро, недорого. Закажите сейчас! Двигайтесь к https://uborka-kvartir24top.ru/
Квиз — это увлекательная игра-викторина, которая сочетает в себе элементы развлечения и интеллектуального состязания. Они могут проходить в различных форматах: от настольных игр до онлайн-викторин и живых мероприятий в кафе или клубах. Популярность квизов растет, поскольку они позволяют людям не только проверить свои знания, но и провести время в компании друзей или незнакомцев, создавая атмосферу дружеского соперничества – [url=https://www.ecmo.ru/mediacategories/obzory-112/rol-kvizov-v-kulturnoy-zhizni-megapolisa-sociokulturnye-i-ekonomicheskie]квиз в москве[/url]
В мире, где чистота и здоровье становятся все более важными, озонаторы представляют собой идеальное решение для поддержания свежести воздуха и уничтожения вредных микроорганизмов. Эти устройства используют озон — мощный природный окислитель, который эффективно борется с бактериями, вирусами и грибками – [url=https://publishernews.ru/NewsAM/NewsAMShow.asp?ID=1677]стерилизатор озоновый[/url]
Здесь вы сможете найти поставщиков удобрений и агрохимии – 306 производителей – [url=https://voronezh-news.net/other/2025/04/16/381501.html]минеральные удобрения оптом.[/url]
ремонт духовых шкафов аег [url=https://aeg-servis-moskva.ru]ремонт кофемашин aeg в мосвке[/url]
Доверьтесь нашему опыту и профессионализму — каждый диван, созданный нашей компанией, станет неотъемлемой частью вашего интерьера
и принесет вам радость и удовлетворение на многие годы вперед – [url=https://pg11.ru/prostranstvennaya-ergonomika-i-transformatsiya-zhilykh-intererov-mezhdistsiplinarniy-podkhod-k-meblirovke-kukhonnogo-prostranstva]диван на кухню[/url]
Повысьте эффективность своего производства с помощью наших приводных устройств! Наши инновационные устройства позволят вам значительно снизить расходы на электроэнергию,
увеличить производительность оборудования и снизить износ механизмов. Благодаря нашиему оборудованию вы сможете значительно увеличить производственные мощности и улучшить качество выпускаемой продукции – [url=https://news.1777.ru/111174-evolyuciya-upravleniya-asinhronnymi-elektrodvigatelyami-ot-prostyh-shem-k-intellektualnym-sistemam]преобразователь частоты для асинхронного двигателя.[/url]
Наша компания – это ключ к вашему идеальному жилищу! Пусть каждый уголок вашего дома станет для вас и вашей семьи источником радости и уюта.
Доверьте строительство своего дома профессионалам и получите результат, о котором мечтали – [url=https://metaphysican.com/arhitektura-upravlenie-i-jekologija-vektory-razvitija-chastnogo-domostroenija-v-malyh-gorodah-rossii.dhtm]дома под ключ саранск[/url]
Желаете скачать Castle Clash на компьютер? Испытайте потрясающим качеством изображения и удобными элементами контроля на большом экране. Побеждайте в захватывающих PvP-баталиях и становитесь лучшим игроком. Для установки Castle Clash воспользуйтесь проверенные эмуляторы Android например NoxPlayer. Просто зайдите на сайт [url=https://bitva-zamkov-na-pc.ru]bitva-zamkov-na-pc.ru[/url], чтобы получить подробную инструкцию. Присоединяйтесь к огромному сообществу Битвы Замков по всему миру!
castle clash скачать
castle clash играть онлайн на пк
играть в castle clash
Мечтаете получить Castle Clash для Windows? Достаточно кликнуть на этой ссылке [url=https://castle-clash-skachat.ru]https://castle-clash-skachat.ru/[/url] и запустите игру на своём ПК уже немедленно! Погрузитесь в мир стратегий Castle Clash с максимальным комфортом.
скачать castle clash
как играть в castle clash на пк
castle clash скачать на русском
Предлагаем вам высококачественный тротуарный бордюр – идеальное решение для обрамления дорожек, газонов, цветников и других элементов ландшафтного дизайна.
Наш тротуарный бордюр отличается прочностью, долговечностью и устойчивостью к воздействию внешних факторов, что делает его идеальным выбором для любых условий эксплуатации – [url=https://novosibirsk-news.net/other/2025/03/10/324959.html]тротуарная плитка краснодар[/url] – [url=https://novosibirsk-news.net/other/2025/03/10/324959.html]тротуарная плитка краснодар[/url]
Исследуйте уникальные предложения на нашем сайте. Мы предоставляем разнообразные позиции для максимального комфорта по https://xn--kr37-rzb.com
Helpful critique! Enhancement potential!
Mostbet Colombia: ¡La mejor plataforma de apuestas deportivas! Bonos exclusivos para nuevos usuarios. ➡️ [url=https://mostbet-win.co/] Mostbet CO bonos[/url]
Outside the box! Original ideas! Mostbet Bangladesh – best betting platform! Enjoy cricket, football and casino games. ➡️ [url=https://shonarbangladesh.com] Mostbet BD [/url] This is hands down one of the most thorough, well-organized, and immediately applicable tutorials I’ve encountered in recent memory.Comparison breakdown! Decision made!
Mostbet România – cel mai bun cazino online! Joacă acum și câștigă premii fabuloase. ➡️ [url=https://mostbet-cazinoului.com/]Mostbet România [/url] . Simple language! Anyone can understand! The way complex ideas are broken down into digestible, actionable steps in this guide is nothing short of brilliant.
Онлайн-площадка — официальная страница частного расследовательской службы.
Мы организуем услуги в сфере сыскной деятельности.
Группа детективов работает с абсолютной дискретностью.
Наша работа включает поиски людей и разные виды расследований.
Заказать детектива
Любая задача рассматривается индивидуально.
Мы используем проверенные подходы и работаем строго в рамках закона.
Ищете реальную помощь — свяжитесь с нами.
танк 300 официальный дилер [url=https://tankautospb.ru/models/tank-300/]https://tankautospb.ru/models/tank-300/[/url] .
мастера по ремонту пластиковых окон недорого: быстро, надёжно, с гарантией!
Запотевшие стёкла, сквозняки, заедающие ручки? Наш сервисный центр в Санкт-Петербурге устранит любые неполадки за 1-3 часа! Бесплатный выезд мастера, точная диагностика, использование оригинальных комплектующих и гарантия до 2 лет — вот почему клиенты выбирают нас. Заказать [url=https://remont-okon-spb-nedorogo.ru/]ремонт и профилактика пластиковых окон спб[/url] можно онлайн или по телефону: специалист приедет в удобное время, вернёт герметичность конструкциям и продлит их срок службы. Работаем 24/7, фиксированные цены, без скрытых наценок. Доверьте окна профессионалам — и забудьте о проблемах!
Admin, Любишь играть и получать удовольствие от игры, тогда не теряй времени зря!
[b][u]Мы даем бонусы при регистрации: [/u][/b]
– [url=https://vavada-rtx1.xyz]Каталог игр[/url]
– [url=https://vavada-rtx2.xyz]Каталог слотов[/url]
– [url=https://vavada-rtx3.xyz]]Каталог столов[/url]
– [url=https://vavada-rtx4.xyz]]Каталог турниров[/url]
– [url=https://vavada-rtx5.xyz]]Каталог бонусов[/url]
– [url=https://vavada-rtx6.xyz]]Каталог фрибетов[/url]
– [url=https://vavada-rtx7.xyz]]Каталог ваучеров[/url]
– [url=https://vavada-rtx8.xyz]]Каталог промокодов[/url]
– [url=https://vavada-rtx9.xyz]]Каталог вейджеров[/url]
– [url=https://vavada-rtx10.xyz]]Каталог рулеток[/url]
На этом сайте вы можете наслаждаться обширной коллекцией игровых автоматов.
Эти слоты славятся живой визуализацией и захватывающим игровым процессом.
Каждый слот предлагает особые бонусные возможности, повышающие вероятность победы.
1 win
Слоты созданы для любителей азартных игр всех мастей.
Вы можете играть бесплатно, после чего начать играть на реальные деньги.
Испытайте удачу и насладитесь неповторимой атмосферой игровых автоматов.
На нашем портале вам предоставляется возможность наслаждаться обширной коллекцией игровых слотов.
Игровые автоматы характеризуются красочной графикой и увлекательным игровым процессом.
Каждый слот предлагает уникальные бонусные раунды, увеличивающие шансы на выигрыш.
1xbet игровые автоматы
Игра в слоты подходит игроков всех уровней.
Можно опробовать игру без ставки, после чего начать играть на реальные деньги.
Испытайте удачу и насладитесь неповторимой атмосферой игровых автоматов.
На этом сайте вы можете испытать широким ассортиментом игровых автоматов.
Игровые автоматы характеризуются красочной графикой и интерактивным игровым процессом.
Каждый слот предлагает индивидуальные бонусные функции, повышающие вероятность победы.
1win
Слоты созданы для любителей азартных игр всех мастей.
Можно опробовать игру без ставки, после чего начать играть на реальные деньги.
Испытайте удачу и насладитесь неповторимой атмосферой игровых автоматов.
На данном ресурсе можно найти популярные онлайн-слоты.
Мы собрали большой выбор слотов от ведущих провайдеров.
Любой автомат отличается оригинальным дизайном, призовыми раундами и щедрыми выплатами.
https://www.mywot.com/scorecard/casinoreg.net
Пользователи могут запускать слоты бесплатно или играть на деньги.
Навигация по сайту интуитивно понятны, что облегчает поиск игр.
Если вас интересуют слоты, этот сайт — отличный выбор.
Начинайте играть уже сегодня — азарт и удача уже рядом!
Ordering medications on the internet can be much easier than going to a physical pharmacy.
You don’t have to deal with crowds or worry about closing times.
Online pharmacies allow you to buy what you need without leaving your house.
Numerous websites provide better prices in contrast to traditional drugstores.
https://faithalone.info/forum/index.php?topic=535.new#new
Additionally, it’s easy to compare different brands quickly.
Reliable shipping makes it even more convenient.
Have you tried buying medicine online?
В наступающем году будут в тренде смелые цветовые сочетания, экологичные материалы и необычный силуэт.
Особое внимание стоит обратить ярких деталей и интересных рисунков.
Модные дизайнеры предлагают играть с формами и не бояться свежие веяния в свой образ.
Классика никуда не исчезает, в то же время их можно дополнить интересными аксессуарами.
Так что ключ к стилю нынешнего сезона — самовыражение и умелое переплетение классики с трендами.
https://samcult.ru/article/pr06/24217
профессиональная уборка бизнес центра
If you are goingg for most excellent contents like I do, just
go too see this site all the time for the reason that it gives featgure contents, thanks
Chedck out my site; akmet.ac.Id
Hi all, here every one is sharing these kinds of familiarity,
thus it’s pleasant to read this webpage, and I used
to pay a visit his webpage all the time.
Alsoo visit my web-site Helaine
Добро пожаловать в Клубника Казино – место, где азарт и возможности для выигрыша сливаются в одну захватывающую игру.
В Клубника Казино собрано множество развлечений:
слоты, рулетки, покер и уникальные игры с живыми дилерами.
Каждая игра в нашем казино – это
шанс на успех, а наша приверженность
безопасности гарантирует вам комфортный и безопасный игровой процесс.
Почему стоит выбрать Clubnika
мобильная версия для игры в интернете?
Мы предлагаем выгодные бонусы для новых игроков, фриспины и регулярные акции, которые
помогут вам увеличить шансы на победу.
Кроме того, мы обеспечиваем быстрые выплаты и
круглосуточную техническую поддержку, чтобы ваше время в
казино было комфортным.
Когда лучше всего начинать играть
в Клубника Казино? Не упустите шанс начать с бонусами и
бесплатными спинами, которые помогут вам ускоренно погрузиться в мир выигрышей.
Вот что ждет вас в Клубника Казино:
Выгодные бонусы и бесплатные спины для новичков.
Будьте в центре событий, участвуйте в турнирах
и акциях с крупными денежными призами и выигрышами.
Новые игры и обновления каждый месяц.
Присоединяйтесь к Клубника Казино,
наслаждайтесь играми и выигрывайте большие призы!. https://clubnika-elitecasino.rest/
Pingback: 17 DIY Headband Holder Ideas - DIY Crafts
Pingback: 11 Pretty & Creative Bow Holder DIY Ideas — Sugar & Cloth