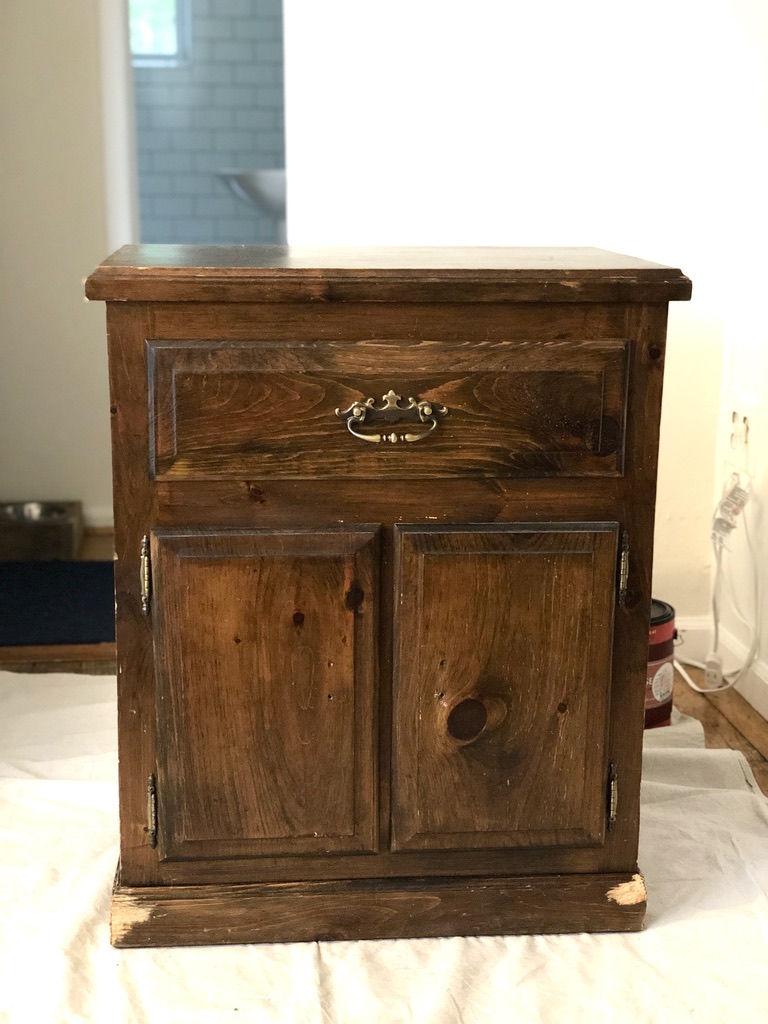
My husband and I have been married for almost a year, and we’ve had this dark piece of furniture hanging around waiting to be transformed into our coffee bar. We have a small empty space of wall between our kitchen and our living room and we knew that that was the place where we wanted to set up a coffee bar. However, when we started looking for a small piece of furniture to redo, we couldn’t find anything that would fit the size. Everything was too wide . . . we kept looking on FB marketplace and Craigslist, but we still couldn’t find anything. Until one day, my husband was working and noticed this beautiful small-ish piece of furniture in his customer’s basement. He inquired about it and boom, the lady sold it to us! It couldn’t have been a more perfect fit for our little house 🙂
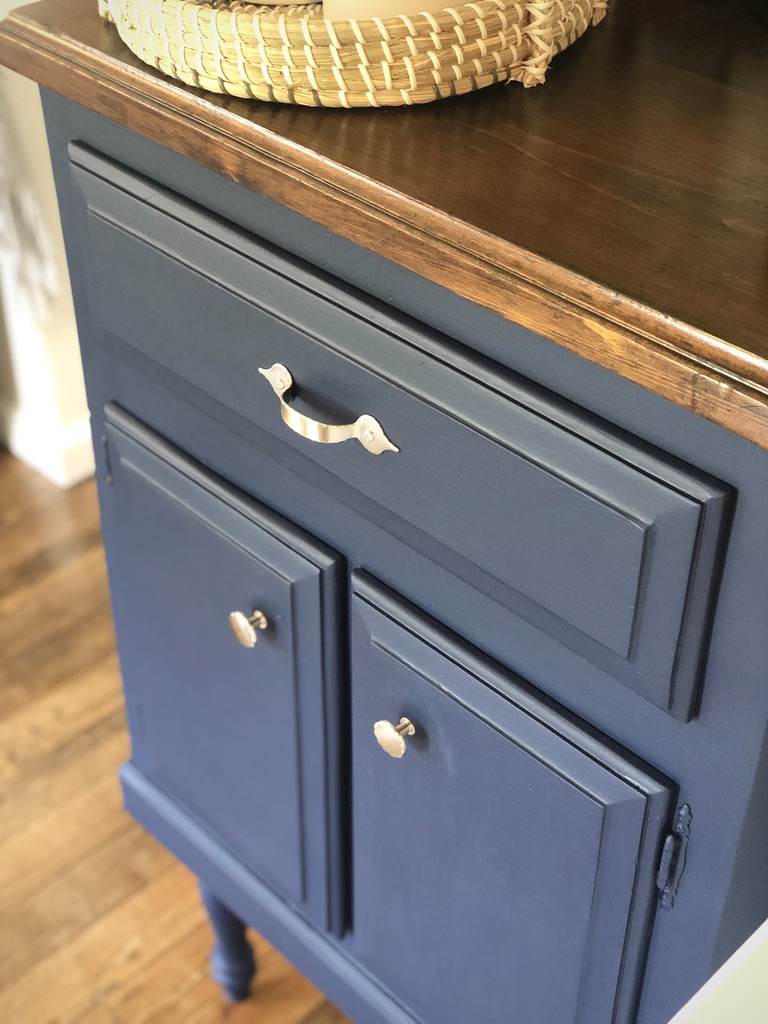
My house is mostly neutral with pops of navy here and there. Since our walls are the “Swiss Coffee” paint color, I knew I wanted the coffee bar to be something that would make a statement against the neutral colors. We got a few paint samples to see which we liked and we ended up using Behr Scuff Defense in the color “Very Navy”. This paint was such an easy paint to use! Better than any chalk paint I’ve used – we used a brush on the majority of it and it’s so forgiving. No brush strokes at all! And I love the matte look – I feel like it has that farmhouse chic look I was going for.
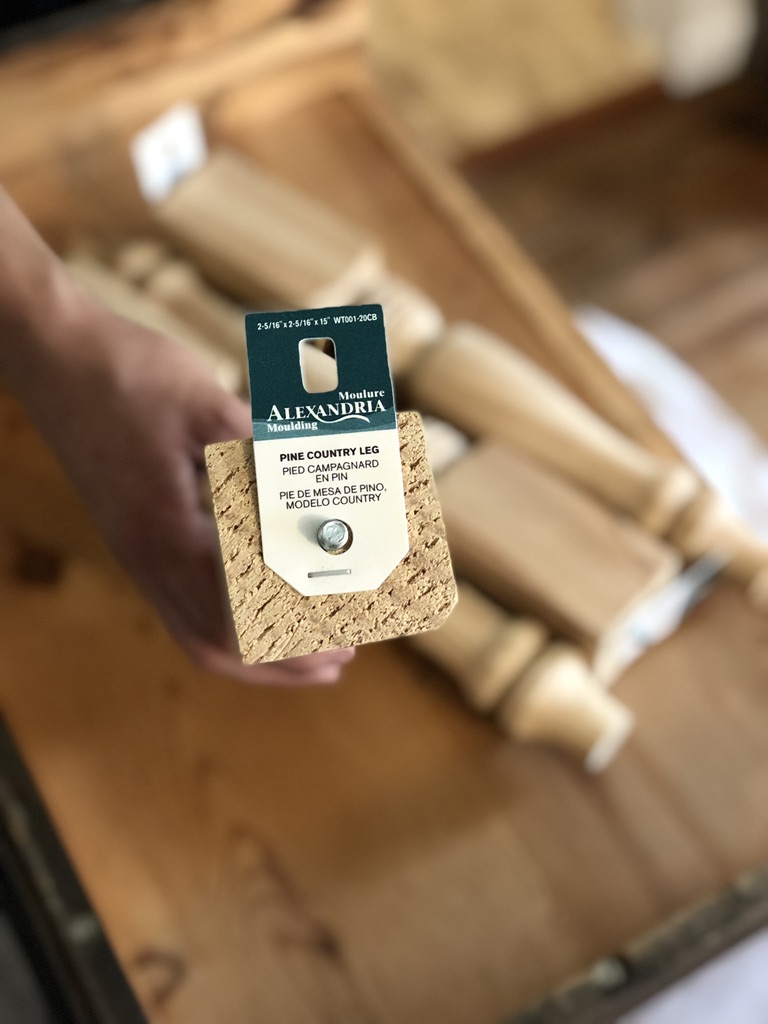
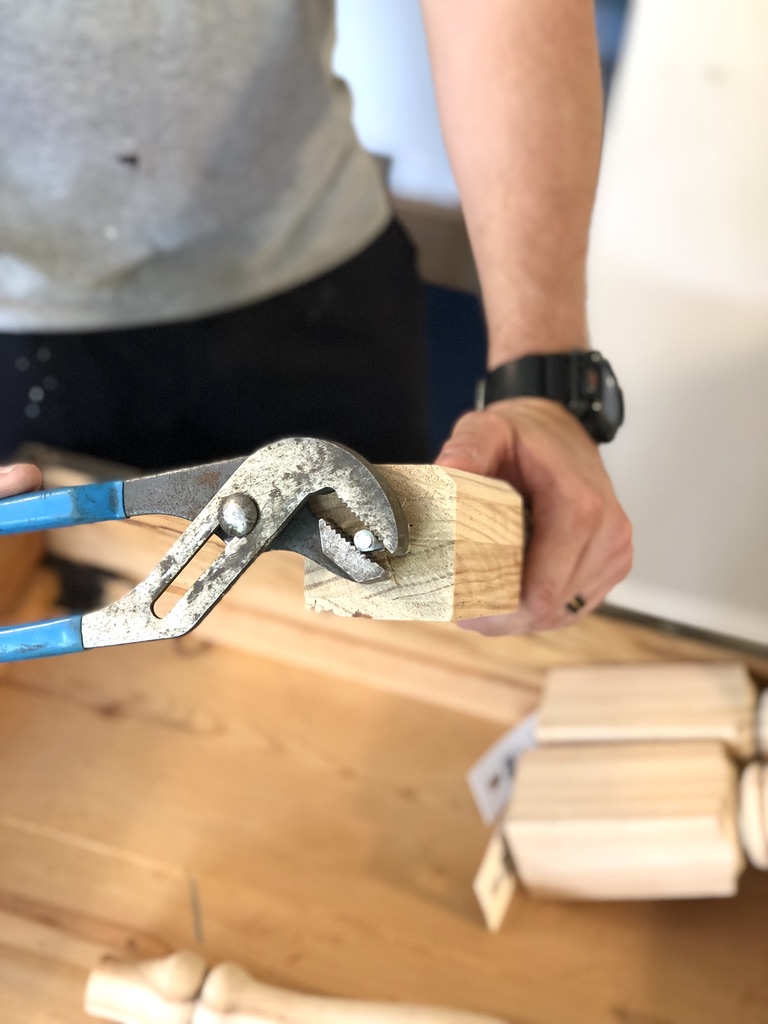
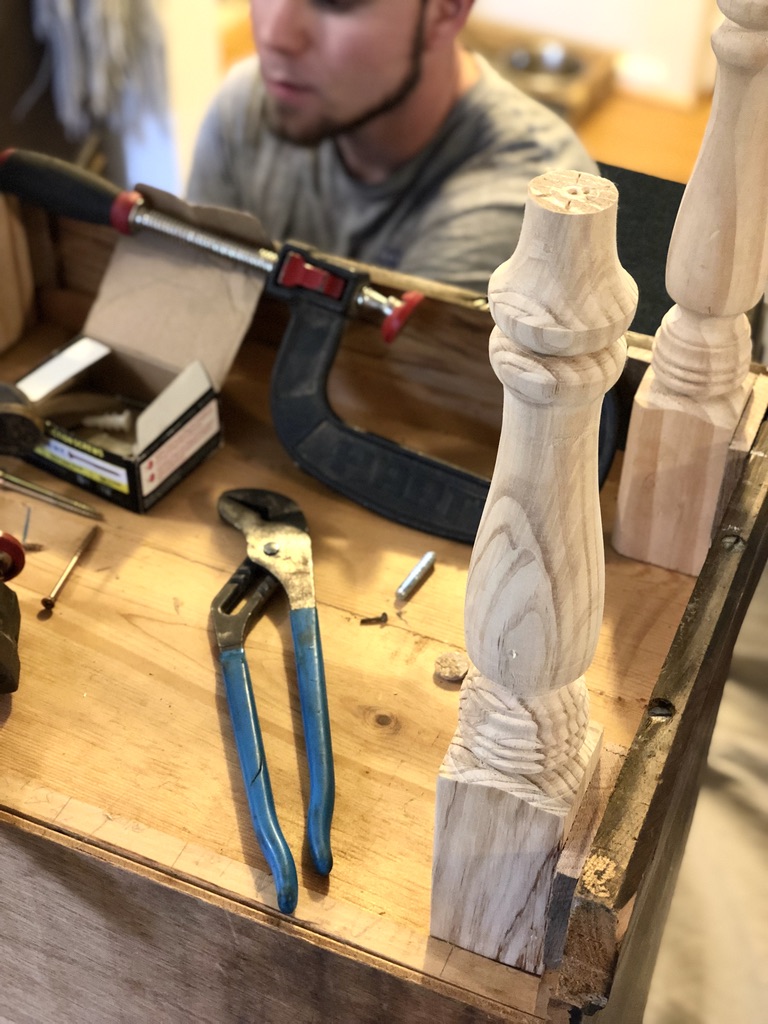
The first thing we did was add legs to it because we knew we wanted to raise it up more to a bar level. We used these legs from Home Depot – they had bolts in the top to use on a piece of furniture so we took those out.
We used some 3-inch construction screws to secure the legs to the bottom – four through the bottom of the coffee bar into the legs and two through the side trim piece into the legs. And you can see my husband put in a small piece of wood between the legs and the trim piece to fill in that empty spot. I’m glad we chose these taller 15″ legs so the coffee bar stands nice and tall.
Once all the legs were on, we started on the back piece. I love wainscoting so I knew that’s what I wanted for the back piece of the coffee bar! We have wainscoting in a couple other rooms of the house and in the basement and I love when everything goes together throughout the house.
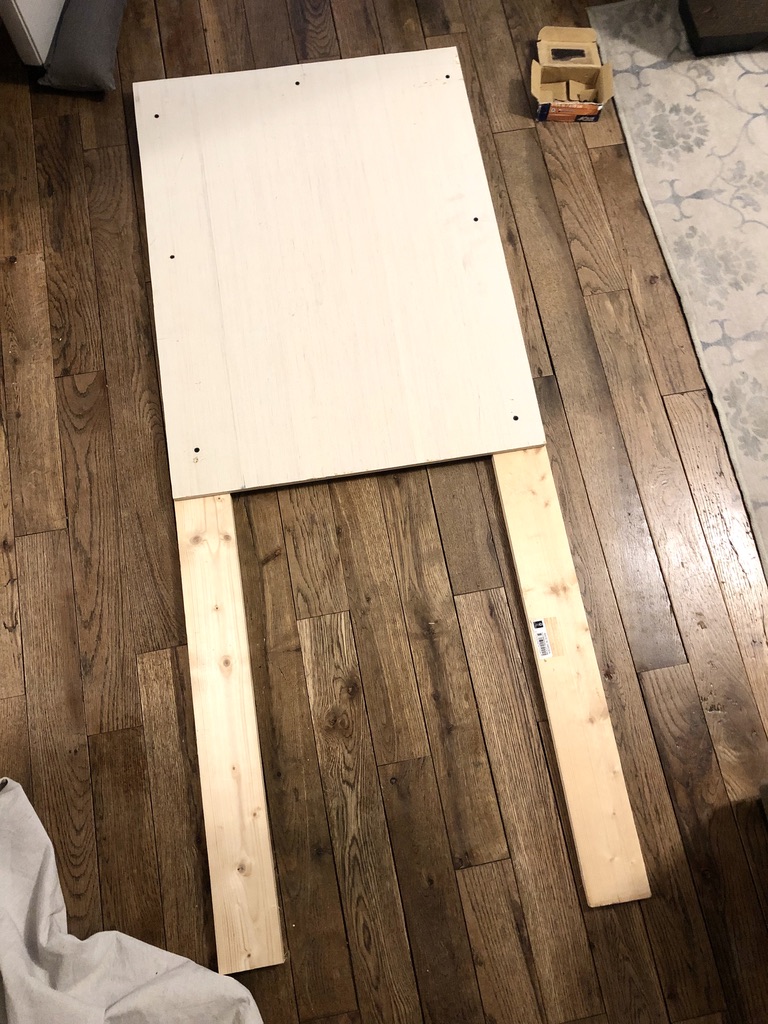
We measured up how tall we wanted the finished coffee bar to be and then built the frame as pictured below, cutting the top and side pieces with a mitre saw so they would butt up together nicely. Also, we planned for the framing pieces to extend down back of the coffee bar so it would be as secure as it could be.
We attached the frame pieces to a 3/4″ piece of plywood (cut to the correct width and height) with 3″ construction screws, making sure the screws are in nice and snug so everything is sturdy.
After that back piece was been assembled, it was time to attach it to the coffee bar! Using the same size of screws we used previously, we screwed in the back piece to the base of the coffee bar – screwing it into the thickest parts of the base.
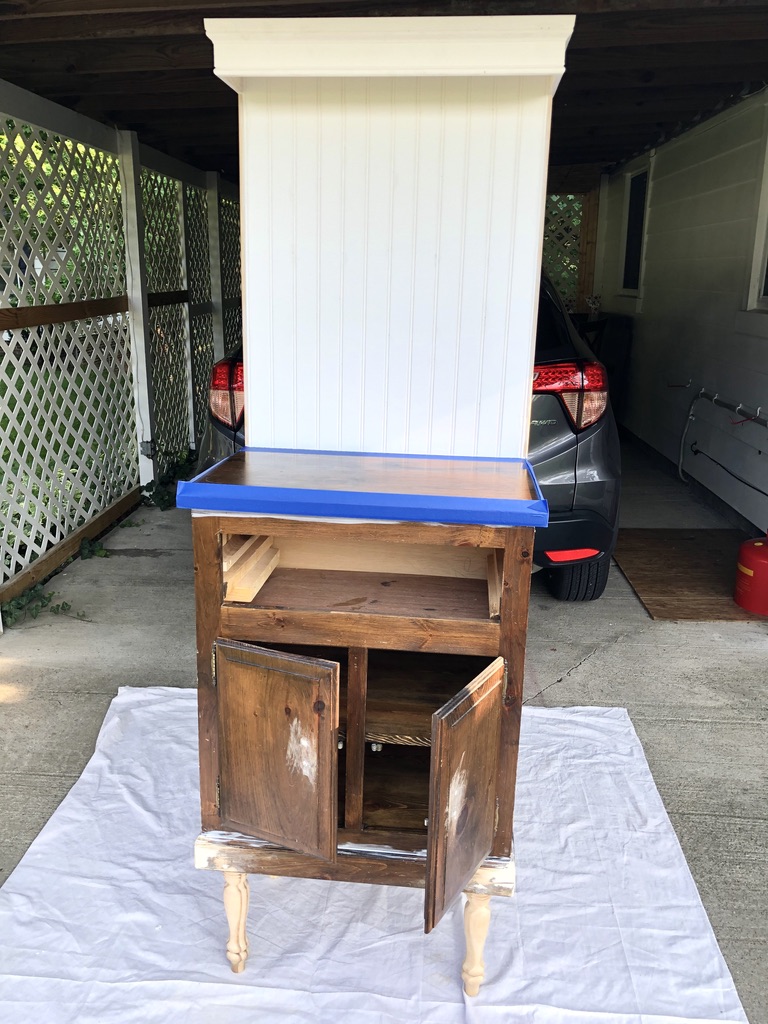
When the framing piece had been screwed on, we used an air nailer to attach the piece of wainscoting, as pictured below.
After that was securely fastened, we filled every crack and crevice with trim caulk. I’m so glad we didn’t skip this step – it makes the whole thing look so much cleaner and professional!
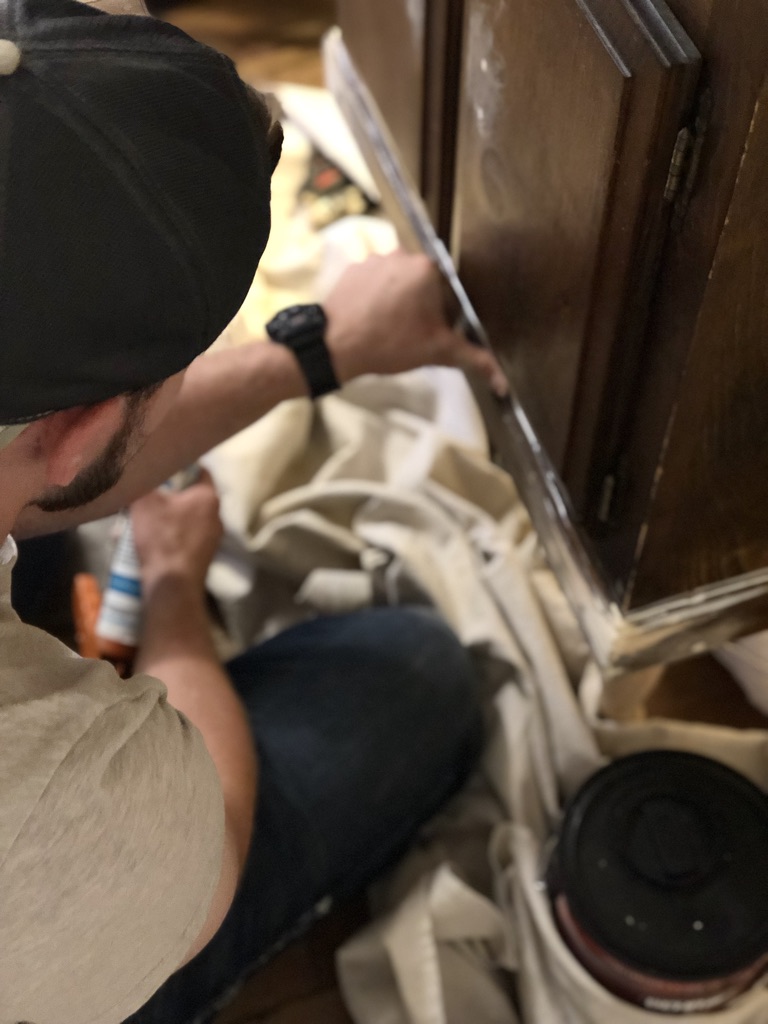
*Also, the corners of the trim on the bottom of the base had been chewed a bit by our pup, so we had to use some wood filler in those to smooth them out before we painted. We also filled in any holes that were there from when we had removed the handles and knobs. After the wood filler had dried completely, we sanded it down to make it smooth for painting.
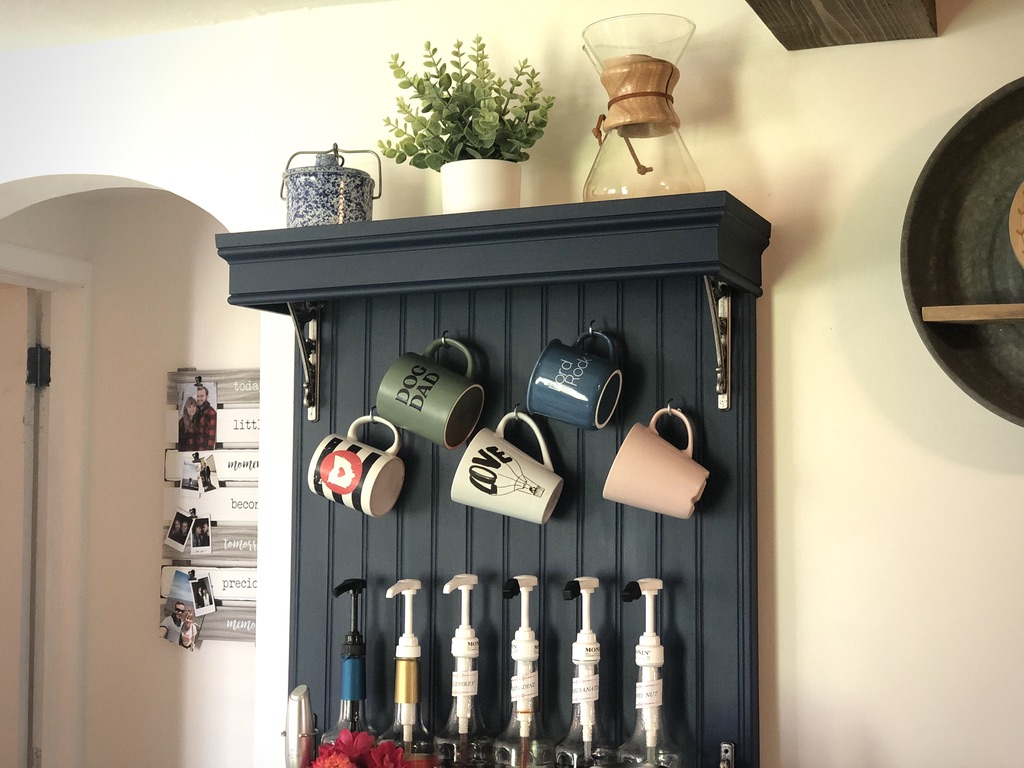
My husband designed and made a shelf for the top but unfortunately, I didn’t get any pictures :-/ He used a trim piece and made the shelf exactly the size we wanted for the top! It turned out so great – originally, we had planned to use a floating shelf that we had gotten but it was an inch or so too small. And really, the custom shelf that Eli made turned out so. much. better. than the pre-made cheap-feeling shelf 🙂 Oh – we made and designed the shelf after we had gotten our brackets so we could make sure they fit up under the shelf nicely.
Next up was painting! I had been so excited for this step from the time we started this project haha.
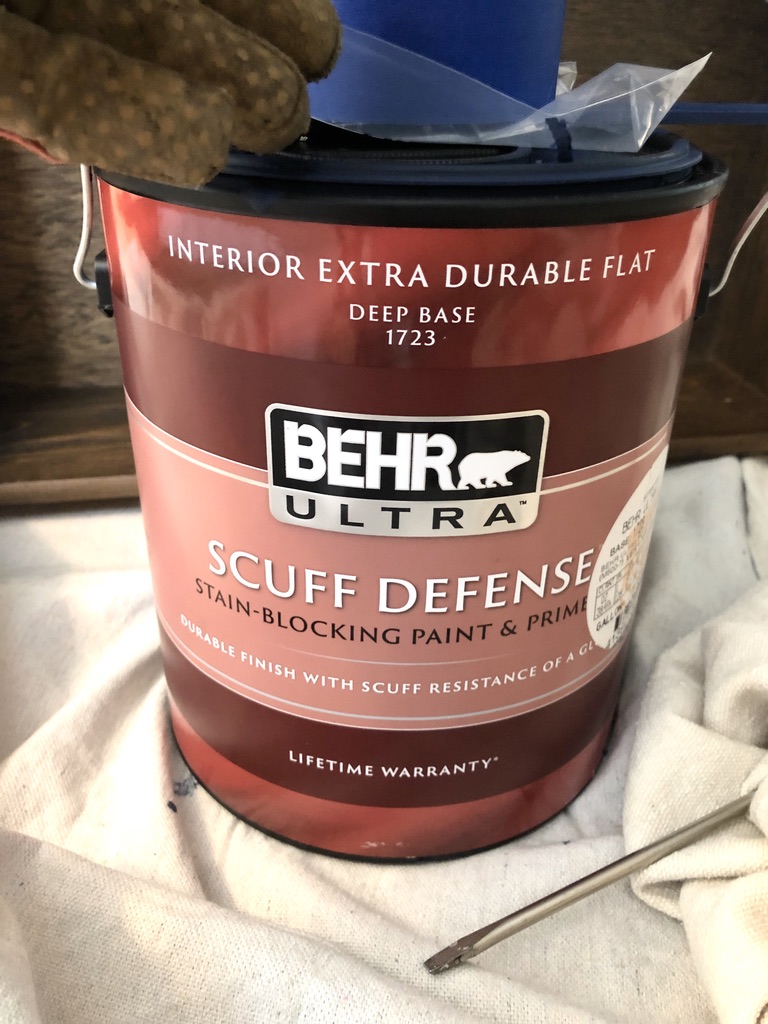
As I said before, we used the Behr Ultra Scuff Defense – Stain-Blocking Paint & Primer. We used the shade “Very Navy” which turned out to be such a beautiful color for our coffee bar!
We ended up doing two full coats and then touching up some spots around the edge of the wainscoting – it needed a bit more since we were painting white wainscoting as opposed to the rest of the coffee bar that was darker. For the majority of the painting, we used a good-bristled brush for the small spots and edges and wainscoting, and a 6″ roller for the rest. As I said earlier, this paint is VERY forgiving and doesn’t show brush or roller marks. We taped off the top to leave it dark instead of painting it blue. One of my favorite things about this coffee bar is the matte finish. I think it really makes it look farmhouse-y and chic!
After we painted the coffee bar, we brought it inside and I applied a coat of Minwax Espresso stain to the top to give it a fresh new look. It really made a difference! I focused the stain on the edges and any other spots that had been a little marked up and scuffed up.
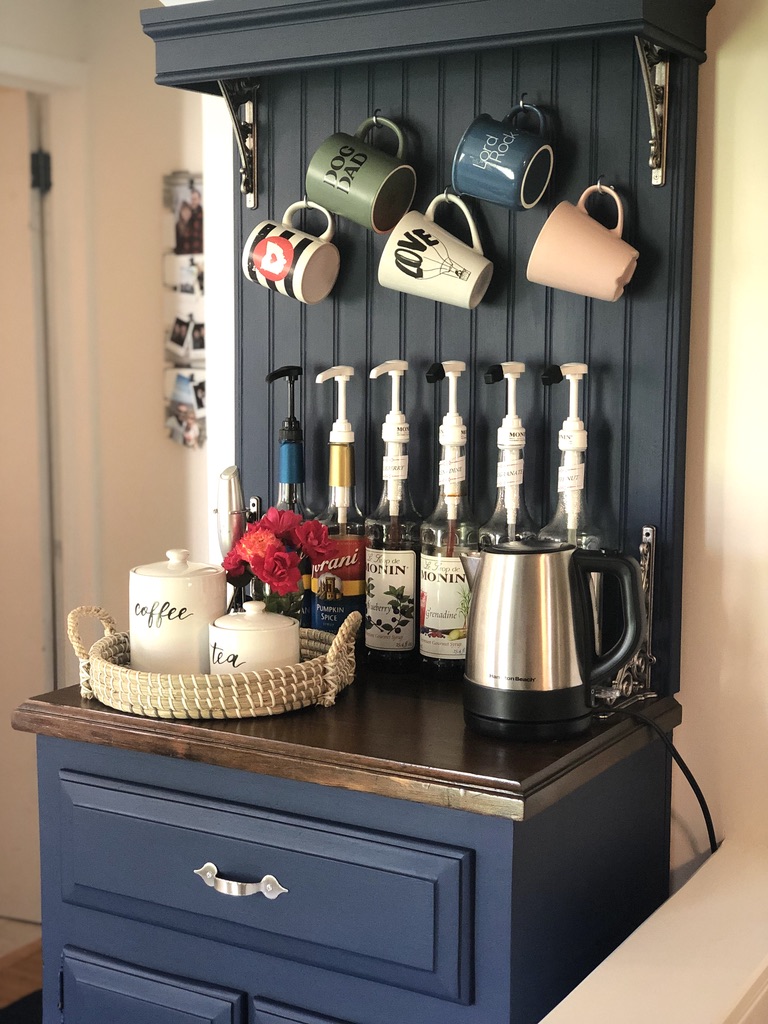
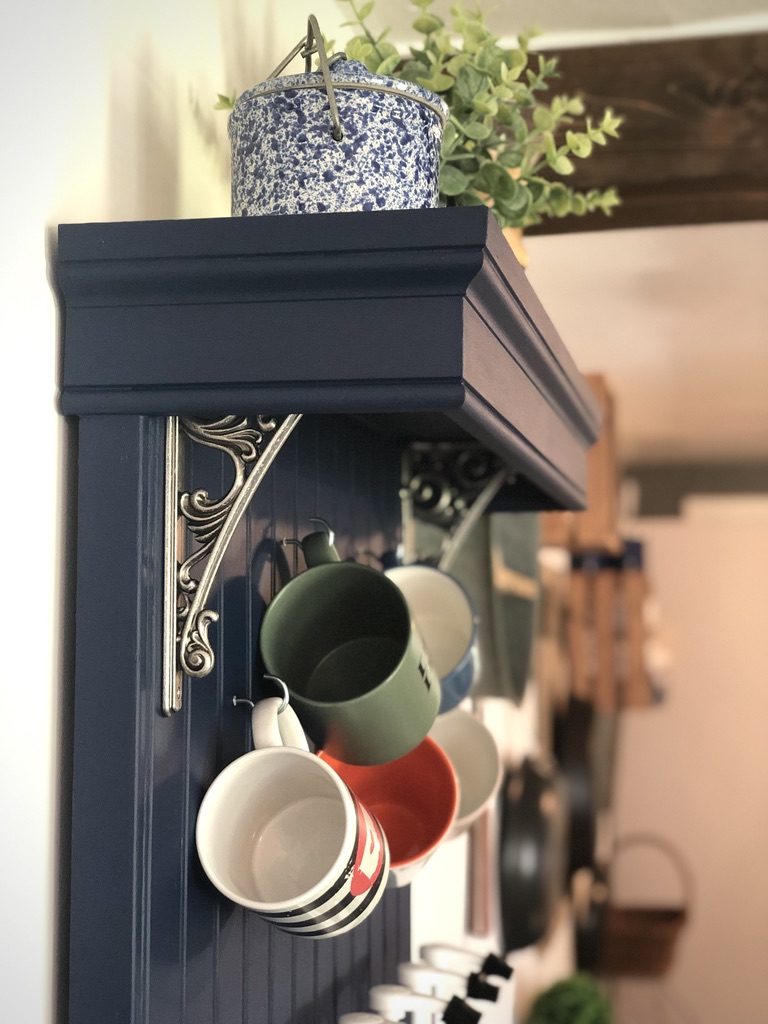
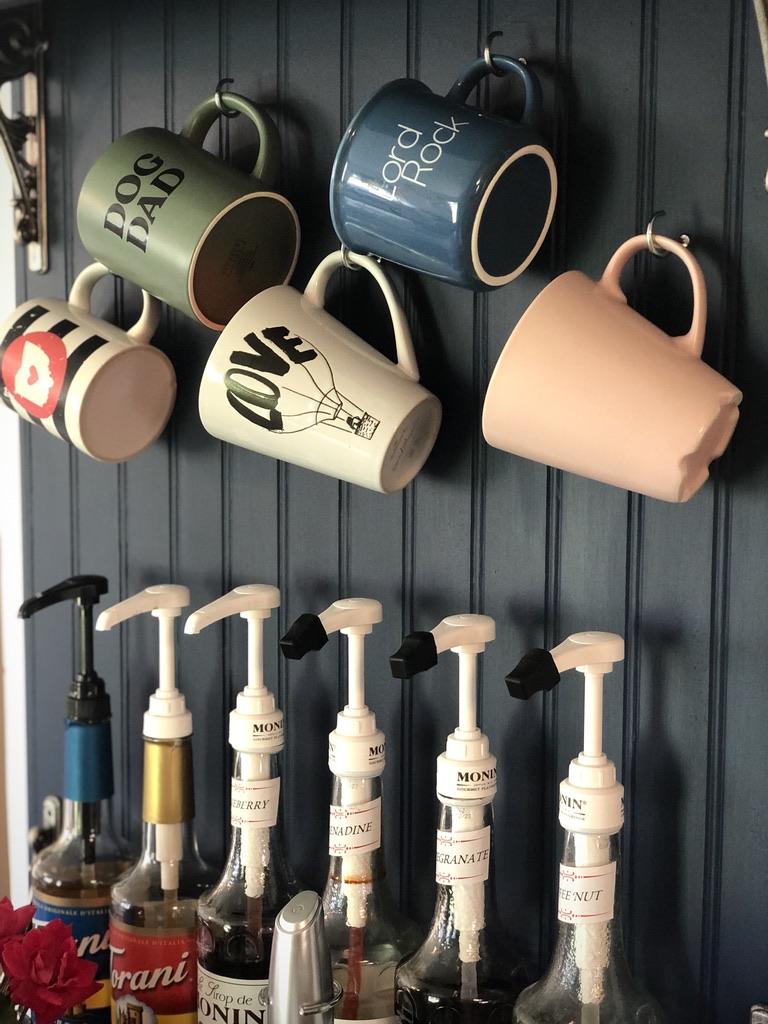
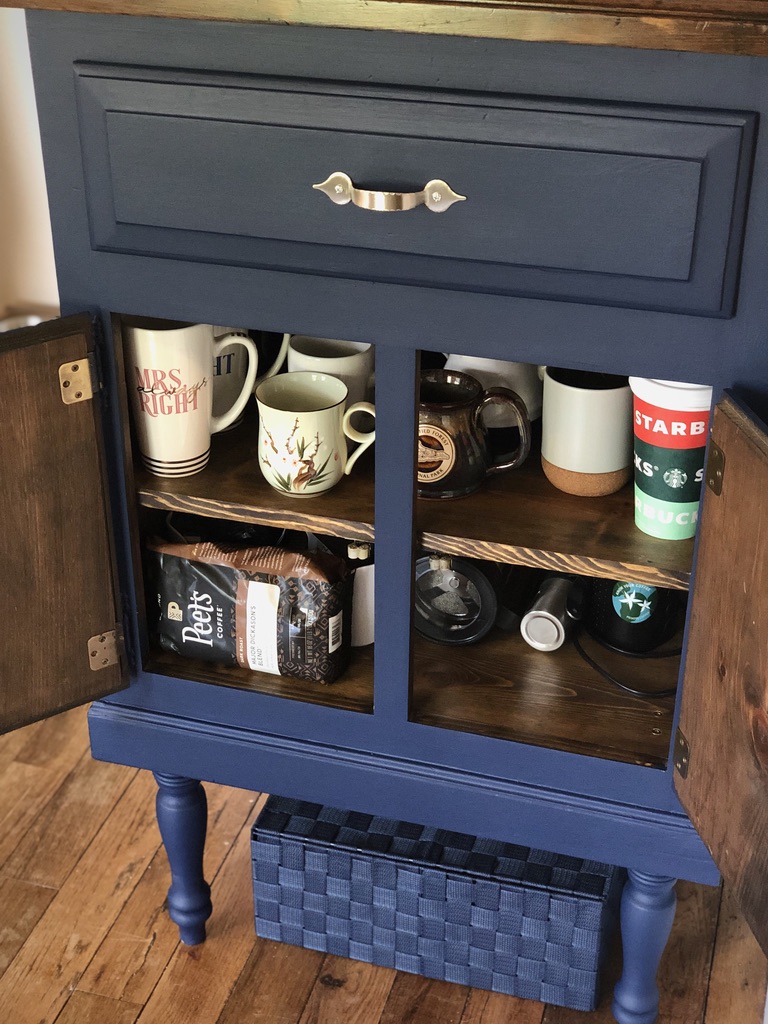
After the paint and stain were dry, we added our cup hooks. We ended up doing three on the bottom and two on the top so we could hang five mugs. The rest of our mugs I put down in the cupboard below.
We used these four brackets for the corners under the shelf and on the base of the coffee bar. I absolutely LOVE these brackets and I feel like they really make the whole piece, don’t you?
Before we attached the brackets, we sealed the wood top with some water-based polyurethane since there would be drinks and food on it. We used Varathane water-based crystal clear matte, but I can’t seem to find it anywhere online for some reason. This is the “satin finish” which would look great if you prefer that instead of matte!
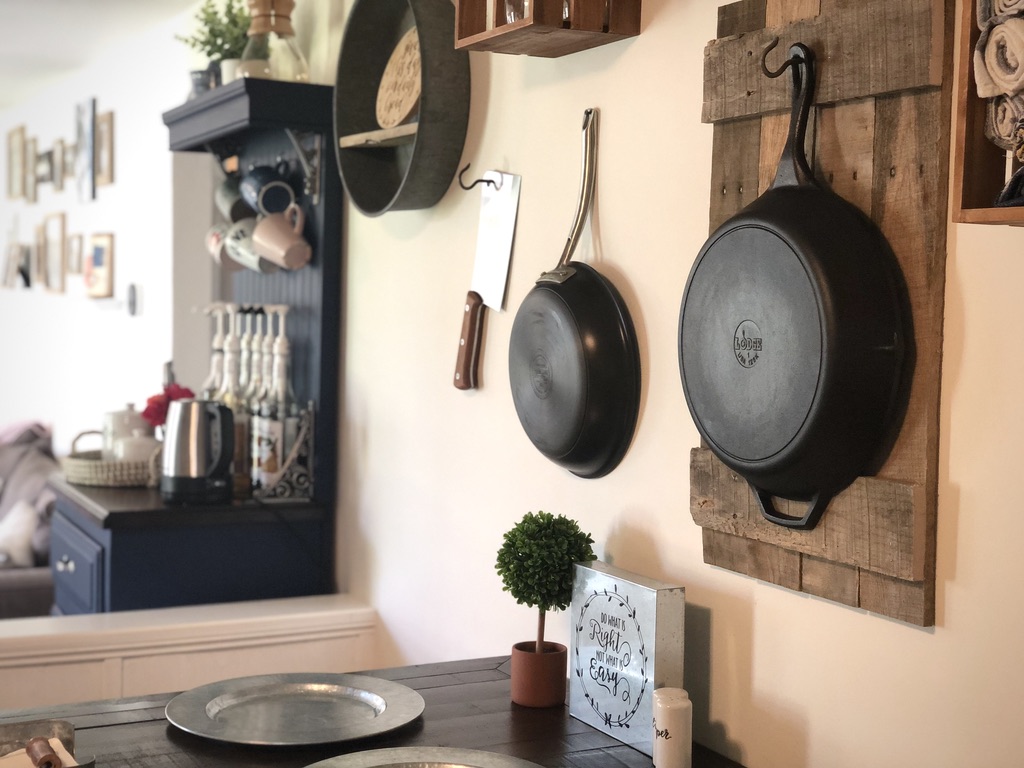
Our drawer handle and door knobs are from Lowe’s. We went with a brushed nickel metal for our accents to match some of the stuff I have hanging on the kitchen wall near the coffee bar. Our brackets, cup hooks, drawer handle, and door knobs all match. I love it!
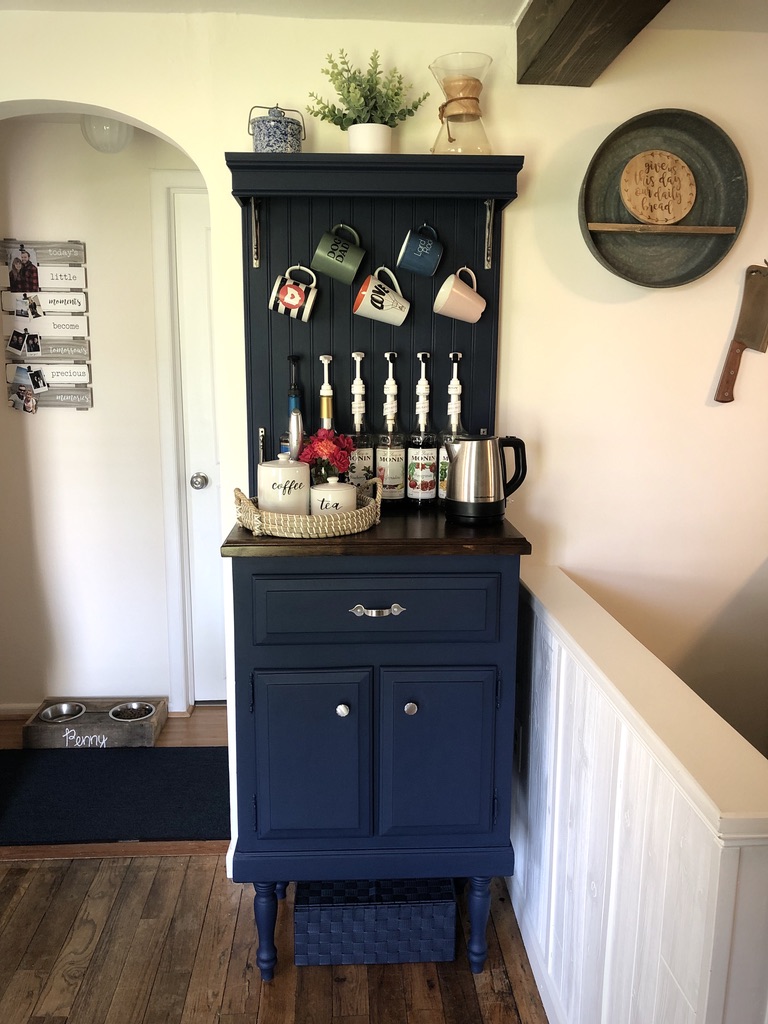
Here is the finished product! I’m so so so happy with the way it turned out and I’m so glad we finally got this project done! All the time we put into the little details made it all worth it 🙂
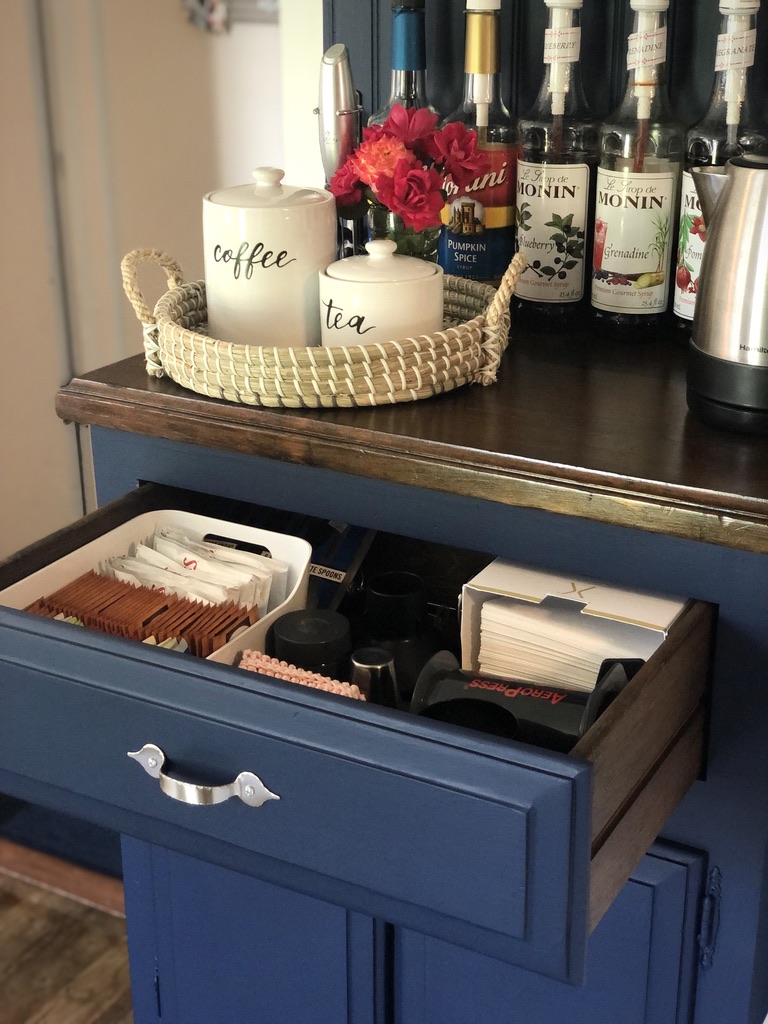
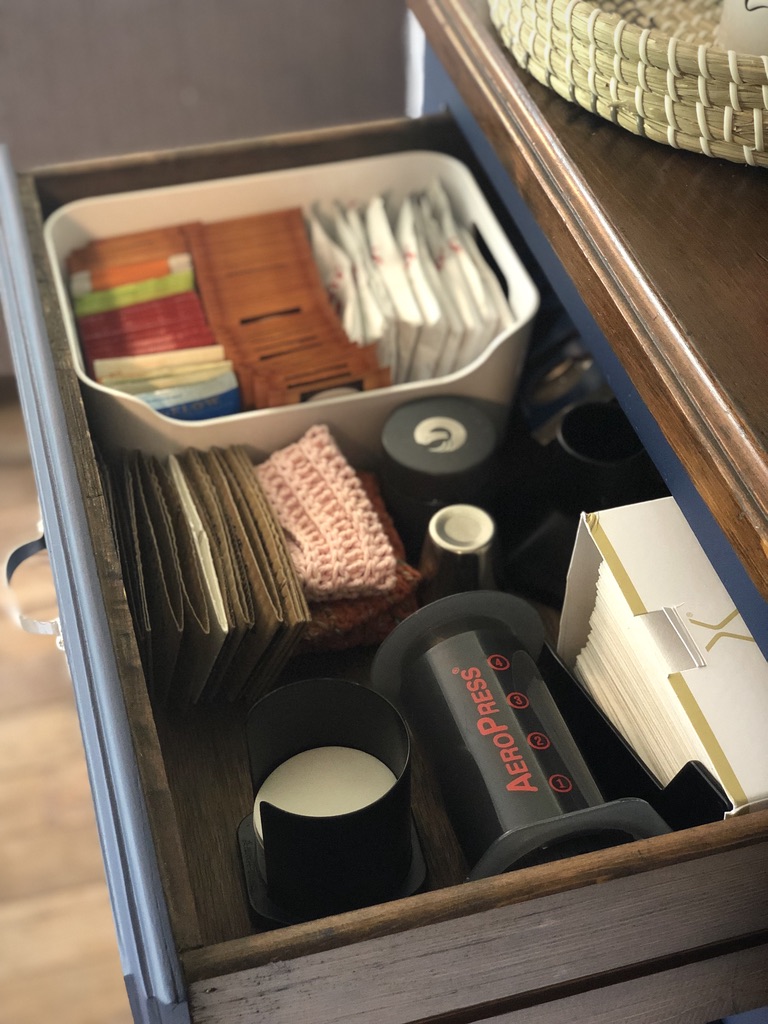
My basket under the coffee bar is from Ross – I use it to store some tea bags and hot chocolate packets. I always buy in bulk when it comes to tea and cocoa, so the leftovers get stashed away under the bar where no one can see them 😉
We have lots of storage space in the drawer and the cabinets below the coffee bar!
My “coffee” and “tea” canisters are from Target – I registered for those for my wedding and I love them so much! I have the “flour”, “sugar”, and “cookies” canisters too! Here are some really cute canisters that would look perfect in a farmhouse kitchen.
If you haven’t tried using an Aeropress yet, I highly recommend. It’s a great way to make a quick cup of coffee!
We also use our Chemex (my husband has the 6-cup one I’m pretty sure, but there are smaller ones if you don’t one that large).
This is my kitchen gallery wall – see how nicely everything flows together with the wall decor and the coffee bar and my photo wall in the living room??? Makes me so happy 🙂
Some of our favorite coffee syrups are the Monin syrups – this coffee collection set would be perfect for a coffee bar! I personally love a simple vanilla or caramel syrup, and a splash of oat milk, in my afternoon coffee. We also like the Torani syrups, although we don’t have as many of those as we do of the Monin 😉
You’ll notice we have a lot of fruit-flavored syrups as well – we love Italian sodas (learn how to make them here). They’re a fun drink to have when people come over for dinner and I love having a ton of flavor options for guests.
If you love coffee, you should try this latte!
Remember the whipped coffee craze that was going around last year or the year before?? Well, the Greeks had something going a long time before that! This Greek frappe is so good and incredibly easy to make at home 🙂









what happens if you take 2 cialis: vigra vs cialis – how long does cialis take to work 10mg
https://tadalaccess.com/# cialis free trial phone number
tadalafil tablets 20 mg side effects: what does cialis do – cialis street price
cialis 20 mg: when will cialis be generic – tadalafil liquid review
where to buy cialis online: cialis generic timeline 2018 – pictures of cialis
https://tadalaccess.com/# order cialis from canada
vigra vs cialis: Tadal Access – cialis online with no prescription
buy cialis united states [url=https://tadalaccess.com/#]cialis com free sample[/url] truth behind generic cialis
https://tadalaccess.com/# cialis tadalafil 20mg price
cialis alternative [url=https://tadalaccess.com/#]Tadal Access[/url] what are the side effects of cialis
cialis from canadian pharmacy registerd: TadalAccess – tadalafil hong kong
does medicare cover cialis for bph: tadalafil generic in usa – buy cialis online in austalia
https://tadalaccess.com/# cialis las vegas
buy cialis online safely: benefits of tadalafil over sidenafil – cheap cialis 20mg
tadalafil generic 20 mg ebay [url=https://tadalaccess.com/#]Tadal Access[/url] cialis for sale online in canada
https://tadalaccess.com/# cialis super active reviews
best price on cialis: centurion laboratories tadalafil review – adcirca tadalafil
cheap cialis generic online: Tadal Access – cialis san diego
cialis 2.5 mg: cialis canada pharmacy no prescription required – tadalafil generic reviews
https://tadalaccess.com/# mail order cialis
cialis 20 mg price walmart: cialis price canada – cialis how long
tadalafil 40 mg india: TadalAccess – what happens if you take 2 cialis
https://tadalaccess.com/# buying generic cialis
cialis generic: tamsulosin vs. tadalafil – cialis superactive
https://tadalaccess.com/# where to buy generic cialis
how long i have to wait to take tadalafil after antifugal: cialis san diego – buy cialis online usa
tadalafil generic headache nausea: online cialis prescription – cialis generic overnite shipping
https://tadalaccess.com/# how long i have to wait to take tadalafil after antifugal
can i take two 5mg cialis at once: TadalAccess – cialis and nitrates
cialis images: cialis 5 mg – what does cialis do
tadalafil price insurance: cialis 30 mg dose – tadalafil (tadalis-ajanta) reviews
https://tadalaccess.com/# when is generic cialis available
what does cialis cost: TadalAccess – cialis over the counter at walmart
cialis price cvs: Tadal Access – cialis at canadian pharmacy
cialis uses: Tadal Access – cialis stories
https://tadalaccess.com/# purchase cialis
what does cialis cost: Tadal Access – us cialis online pharmacy
cialis 2.5 mg [url=https://tadalaccess.com/#]Tadal Access[/url] tadalafil no prescription forum
cialis street price: cialis tadalafil discount – cialis free trial 2018
online tadalafil: cipla tadalafil review – cialis price canada
https://tadalaccess.com/# when is generic cialis available
cialis dose: TadalAccess – cheap cialis
cialis manufacturer coupon lilly: cialis generic – sildenafil vs tadalafil vs vardenafil
https://tadalaccess.com/# buying cialis in canada
tadalafil review: does medicare cover cialis – buy generic cialis
https://tadalaccess.com/# prescription for cialis
cialis liquid for sale: Tadal Access – online cialis
where can i buy cialis online in canada: TadalAccess – best place to get cialis without pesricption
https://tadalaccess.com/# generic cialis
canada cialis: Tadal Access – cialis how long does it last
maximpeptide tadalafil review: sildenafil vs cialis – purchase cialis on line
https://tadalaccess.com/# tadalafil and sildenafil taken together
tadalafil cheapest price: Tadal Access – tadalafil dapoxetine tablets india
cialis medicare: TadalAccess – cialis none prescription
https://tadalaccess.com/# cialis dosage for bph
tadalafil canada is it safe: TadalAccess – cialis free trial coupon
buy tadalafil online no prescription: buy tadalafil no prescription – cialis one a day with dapoxetine canada
https://tadalaccess.com/# what doe cialis look like
sanofi cialis otc [url=https://tadalaccess.com/#]cialis 5mg price cvs[/url] buy cialis generic online 10 mg
cialis coupon free trial: levitra vs cialis – when does cialis go generic
https://tadalaccess.com/# erectile dysfunction tadalafil
what does cialis treat: Tadal Access – what is cialis good for
cialis superactive: cialis and nitrates – cialis 20 mg how long does it take to work
https://tadalaccess.com/# cialis cost at cvs
cialis for sale online in canada: cialis prescription assistance program – us pharmacy cialis
price comparison tadalafil: buy tadalafil online no prescription – can you purchase tadalafil in the us
https://tadalaccess.com/# cialis sublingual
cialis daily review: Tadal Access – canadian pharmacy online cialis
https://tadalaccess.com/# cialis price canada
where to buy tadalafil online: TadalAccess – cialis las vegas
tadalafil and sildenafil taken together: cialis free trial canada – cialis for bph
tadalafil softsules tuf 20: cialis pill – cialis generic best price
when will cialis become generic [url=https://tadalaccess.com/#]Tadal Access[/url] what is cialis taken for
https://tadalaccess.com/# buy cialis 20 mg online
who makes cialis: cialis tadalafil 20mg tablets – cialis leg pain
where to buy tadalafil in singapore: cialis super active vs regular cialis – cialis price walmart
cialis paypal [url=https://tadalaccess.com/#]TadalAccess[/url] cialis for sale over the counter
https://tadalaccess.com/# where to get free samples of cialis
cialis experience: TadalAccess – cialis free sample
canada cialis generic: Tadal Access – cheap generic cialis canada
cialis delivery held at customs: what is the active ingredient in cialis – what to do when cialis stops working
where to buy liquid cialis: Tadal Access – pastillas cialis
https://tadalaccess.com/# cialis 5mg review
cialis black 800 mg pill house [url=https://tadalaccess.com/#]Tadal Access[/url] cialis back pain
cialis vs.levitra: TadalAccess – cialis dosage for ed
https://tadalaccess.com/# erectile dysfunction tadalafil
cialis medicine: tadalafil citrate research chemical – cialis overnight deleivery
https://tadalaccess.com/# can you drink wine or liquor if you took in tadalafil
buy generic cialis online [url=https://tadalaccess.com/#]Tadal Access[/url] buy cheap tadalafil online
brand cialis: TadalAccess – where can i get cialis
how long does cialis take to work 10mg: how to buy cialis – printable cialis coupon
https://tadalaccess.com/# generic tadalafil prices
where can i buy cialis online in australia: TadalAccess – order cialis canada
generic tadalafil in us: cialis para que sirve – cialis tadalafil & dapoxetine
https://tadalaccess.com/# cialis purchase
cialis how to use: п»їwhat can i take to enhance cialis – wallmart cialis
cialis drug class: cialis canada pharmacy no prescription required – cheap cialis with dapoxetine
https://tadalaccess.com/# is there a generic cialis available?
where to get the best price on cialis: TadalAccess – cialis lower blood pressure
cialis 20 mg from united kingdom [url=https://tadalaccess.com/#]Tadal Access[/url] tadalafil brand name
cialis how long: cialis over the counter at walmart – cialis for performance anxiety
https://tadalaccess.com/# cialis dapoxetine
u.s. pharmacy prices for cialis: Tadal Access – cialis 5 mg
https://tadalaccess.com/# does medicare cover cialis
cialis not working: Tadal Access – cialis 5mg best price
cheap cialis: Tadal Access – cialis review
https://tadalaccess.com/# cialis 5mg daily how long before it works
cialis 5mg price cvs: Tadal Access – can you drink wine or liquor if you took in tadalafil
cialis tadalafil tablets: us cialis online pharmacy – cialis 5mg cost per pill
cialis dopoxetine: TadalAccess – cialis experience
https://tadalaccess.com/# cialis w/o perscription
best time to take cialis 20mg: cialis 10mg – cialis dosis
tadalafil generic usa: benefits of tadalafil over sidenafil – what happens if you take 2 cialis
https://tadalaccess.com/# cialis not working first time
can i order generic clomid pills: can i order cheap clomid tablets – can i order generic clomid for sale
how to purchase prednisone online: can you buy prednisone without a prescription – generic prednisone otc
buy amoxicillin online mexico: Amo Health Care – amoxicillin 500mg prescription
over the counter prednisone medicine: PredniHealth – 50 mg prednisone canada pharmacy
https://clomhealth.com/# where to get cheap clomid price
PredniHealth: where can i buy prednisone – prednisone pharmacy prices
Amo Health Care: Amo Health Care – Amo Health Care
https://prednihealth.com/# prednisone 50 mg for sale
where can i get cheap clomid without insurance: cheap clomid – can you buy cheap clomid prices
ampicillin amoxicillin: Amo Health Care – amoxicillin 500 mg online
order generic clomid no prescription: can i order generic clomid now – can i purchase cheap clomid
https://prednihealth.shop/# prednisone brand name us
where to buy amoxicillin over the counter: amoxicillin 50 mg tablets – purchase amoxicillin 500 mg
PredniHealth: prednisone 15 mg tablet – PredniHealth
can you get clomid now: can i order generic clomid – where to buy clomid online
https://amohealthcare.store/# Amo Health Care
prednisone 250 mg: prednisone 20 mg in india – buy cheap prednisone
Amo Health Care: how much is amoxicillin – generic amoxicillin online
can you buy cheap clomid: where to get generic clomid without prescription – where to buy clomid online
http://clomhealth.com/# how can i get clomid online
Amo Health Care: Amo Health Care – amoxicillin azithromycin
Amo Health Care: Amo Health Care – amoxicillin 500 mg without a prescription
Amo Health Care: amoxicillin over the counter in canada – Amo Health Care
https://clomhealth.com/# how can i get cheap clomid without insurance
PredniHealth: PredniHealth – buy prednisone with paypal canada
PredniHealth: prednisone 100 mg – no prescription prednisone canadian pharmacy
cost of generic clomid no prescription: Clom Health – cheap clomid without a prescription
http://maxviagramd.com/# secure checkout Viagra
modafinil pharmacy: legal Modafinil purchase – modafinil 2025
secure checkout Viagra: safe online pharmacy – buy generic Viagra online
https://maxviagramd.com/# secure checkout Viagra
legal Modafinil purchase: safe modafinil purchase – buy modafinil online
Modafinil for sale [url=https://modafinilmd.store/#]legal Modafinil purchase[/url] doctor-reviewed advice
best price Cialis tablets: buy generic Cialis online – generic tadalafil
buy modafinil online: doctor-reviewed advice – Modafinil for sale
generic sildenafil 100mg: secure checkout Viagra – secure checkout Viagra
affordable ED medication: online Cialis pharmacy – generic tadalafil
http://modafinilmd.store/# legal Modafinil purchase
secure checkout ED drugs: reliable online pharmacy Cialis – reliable online pharmacy Cialis
modafinil pharmacy: verified Modafinil vendors – buy modafinil online
secure checkout Viagra: fast Viagra delivery – secure checkout Viagra
order Viagra discreetly: Viagra without prescription – order Viagra discreetly
trusted Viagra suppliers [url=https://maxviagramd.com/#]safe online pharmacy[/url] safe online pharmacy
buy modafinil online: modafinil 2025 – buy modafinil online
http://modafinilmd.store/# safe modafinil purchase
legal Modafinil purchase: purchase Modafinil without prescription – verified Modafinil vendors
buy modafinil online: purchase Modafinil without prescription – verified Modafinil vendors
order Cialis online no prescription: online Cialis pharmacy – affordable ED medication
modafinil 2025 [url=https://modafinilmd.store/#]purchase Modafinil without prescription[/url] modafinil pharmacy
https://modafinilmd.store/# legal Modafinil purchase
doctor-reviewed advice: Modafinil for sale – doctor-reviewed advice
discreet shipping ED pills: reliable online pharmacy Cialis – affordable ED medication
modafinil legality: doctor-reviewed advice – doctor-reviewed advice
no doctor visit required: Viagra without prescription – cheap Viagra online
legit Viagra online: discreet shipping – no doctor visit required
http://modafinilmd.store/# verified Modafinil vendors
trusted Viagra suppliers: best price for Viagra – discreet shipping
legal Modafinil purchase: buy modafinil online – verified Modafinil vendors
FDA approved generic Cialis: order Cialis online no prescription – order Cialis online no prescription
fast Viagra delivery: discreet shipping – same-day Viagra shipping
affordable ED medication [url=https://zipgenericmd.com/#]buy generic Cialis online[/url] secure checkout ED drugs
FDA approved generic Cialis: order Cialis online no prescription – FDA approved generic Cialis
generic tadalafil: order Cialis online no prescription – online Cialis pharmacy
best price for Viagra: same-day Viagra shipping – fast Viagra delivery
online Cialis pharmacy: cheap Cialis online – reliable online pharmacy Cialis
order Cialis online no prescription: online Cialis pharmacy – cheap Cialis online
doctor-reviewed advice [url=http://modafinilmd.store/#]modafinil pharmacy[/url] modafinil legality
order Viagra discreetly: discreet shipping – safe online pharmacy
modafinil 2025: purchase Modafinil without prescription – modafinil 2025
purchase Modafinil without prescription: doctor-reviewed advice – modafinil pharmacy
verified Modafinil vendors [url=https://modafinilmd.store/#]purchase Modafinil without prescription[/url] verified Modafinil vendors
best price Cialis tablets: buy generic Cialis online – buy generic Cialis online
generic tadalafil: online Cialis pharmacy – FDA approved generic Cialis
pin-up [url=http://pinupaz.top/#]pinup az[/url] pin up
пинап казино: пин ап казино официальный сайт – пин ап казино
pin-up casino giris: pin-up casino giris – pin-up casino giris
пин ап казино официальный сайт: пин ап вход – пин ап зеркало
pin up casino: pin up az – pin-up
pin up вход: pin up вход – пин ап вход
pin up casino [url=https://pinupaz.top/#]pin up casino[/url] pin up casino
вавада: вавада – вавада
pin up casino: pin up azerbaycan – pin up azerbaycan
pin up casino [url=http://pinupaz.top/#]pin up casino[/url] pin-up
pin up az: pin up casino – pin up
https://vavadavhod.tech/# vavada casino
vavada: вавада официальный сайт – вавада казино
pin-up [url=http://pinupaz.top/#]pin up[/url] pinup az
pinup az: pin up az – pin up az
vavada: вавада зеркало – vavada casino
vavada вход [url=https://vavadavhod.tech/#]вавада казино[/url] vavada
пин ап вход: пин ап вход – пин ап зеркало
пин ап казино официальный сайт: пин ап казино – пинап казино
pinup az: pin up – pinup az
vavada [url=https://vavadavhod.tech/#]vavada[/url] вавада официальный сайт
pin up вход: пин ап зеркало – пин ап вход
вавада: вавада зеркало – вавада
pin-up: pinup az – pin up az
vavada [url=https://vavadavhod.tech/#]вавада официальный сайт[/url] вавада казино
pin-up: pin up – pin up
pin up вход: пинап казино – пинап казино
pin up вход [url=http://pinuprus.pro/#]пин ап зеркало[/url] пин ап казино официальный сайт
пин ап зеркало: пин ап зеркало – пин ап казино официальный сайт
vavada casino: вавада официальный сайт – вавада официальный сайт
вавада официальный сайт [url=http://vavadavhod.tech/#]вавада зеркало[/url] vavada вход
pin-up casino giris: pin-up casino giris – pin-up
pin up: pin-up casino giris – pin up az
вавада [url=http://vavadavhod.tech/#]vavada casino[/url] vavada вход
пинап казино: пинап казино – пинап казино
pin up вход: пинап казино – пин ап вход
вавада казино: вавада казино – вавада официальный сайт
пин ап вход: пин ап вход – пин ап вход
пин ап вход [url=https://pinuprus.pro/#]пин ап зеркало[/url] пин ап вход
pin up: pin-up – pin up az
pin up casino: pin up – pin up az
pin up вход: pin up вход – пинап казино
pin up casino: pin up az – pin up azerbaycan
vavada casino [url=https://vavadavhod.tech/#]вавада официальный сайт[/url] вавада казино
пин ап зеркало: pin up вход – пин ап казино
pin up casino [url=http://pinupaz.top/#]pin up azerbaycan[/url] pin-up
pin up: pinup az – pin-up casino giris
pin up azerbaycan: pinup az – pin up
вавада казино [url=http://vavadavhod.tech/#]вавада[/url] vavada
пин ап вход: пин ап зеркало – пин ап вход
pin-up [url=http://pinupaz.top/#]pin-up casino giris[/url] pin up
пин ап зеркало: пин ап казино – pin up вход
вавада официальный сайт: вавада официальный сайт – vavada casino
pin up вход [url=https://pinuprus.pro/#]пин ап вход[/url] пин ап казино
вавада зеркало: вавада – вавада зеркало
вавада официальный сайт: vavada casino – вавада казино
pin up azerbaycan: pinup az – pin-up
pinup az [url=http://pinupaz.top/#]pinup az[/url] pin up casino
вавада зеркало: вавада зеркало – вавада
pin-up: pin-up casino giris – pin-up casino giris
pin up вход [url=http://pinuprus.pro/#]пинап казино[/url] pin up вход
pin up вход: пин ап вход – пин ап вход
pin up вход: пинап казино – пин ап вход
vavada casino: вавада зеркало – вавада казино
vavada: vavada вход – вавада зеркало
вавада официальный сайт [url=http://vavadavhod.tech/#]vavada вход[/url] вавада
vavada casino: вавада зеркало – вавада казино
pin up вход: пин ап зеркало – pin up вход
пинап казино: пин ап вход – pin up вход
pin up вход: пин ап казино официальный сайт – пин ап вход
вавада официальный сайт: вавада официальный сайт – вавада зеркало
vavada вход: вавада – вавада зеркало
пинап казино [url=http://pinuprus.pro/#]pin up вход[/url] пинап казино
pin up: pin up casino – pin up az
pin up azerbaycan: pinup az – pin up casino
pin up azerbaycan: pin up azerbaycan – pin up casino
вавада [url=http://vavadavhod.tech/#]вавада зеркало[/url] vavada
pin up casino: pin up azerbaycan – pin up az
пин ап казино: пин ап казино официальный сайт – пин ап зеркало
вавада: вавада казино – vavada вход
pin-up casino giris: pin up casino – pin-up
vavada: vavada – вавада официальный сайт
https://pinuprus.pro/# pin up вход
пин ап казино официальный сайт: pin up вход – пин ап зеркало
pin up azerbaycan: pin up az – pin-up
pin up casino: pin up az – pin-up
vavada casino [url=http://vavadavhod.tech/#]вавада казино[/url] вавада
pin up azerbaycan: pin-up – pin up azerbaycan
пин ап казино официальный сайт: пинап казино – пин ап вход
pin-up: pinup az – pin up az
вавада официальный сайт: вавада официальный сайт – vavada casino
пин ап зеркало: пин ап зеркало – pin up вход
pinup az: pinup az – pin up
пин ап казино официальный сайт: пин ап казино – пин ап казино
пин ап вход: пин ап зеркало – pin up вход
pin up az: pin up az – pin up
pin up: pin up casino – pin-up
пин ап зеркало: пин ап казино – пинап казино
pin up [url=http://pinupaz.top/#]pinup az[/url] pin up az
pin up azerbaycan: pin-up – pin-up
пинап казино [url=http://pinuprus.pro/#]пин ап вход[/url] пин ап зеркало
pin up casino [url=http://pinupaz.top/#]pin-up casino giris[/url] pinup az
pin up: pinup az – pin-up casino giris
пин ап вход: пин ап вход – пин ап зеркало
vavada casino [url=https://vavadavhod.tech/#]vavada вход[/url] вавада зеркало
vavada: vavada casino – вавада зеркало
vavada [url=https://vavadavhod.tech/#]vavada вход[/url] vavada вход
best india pharmacy: indian pharmacy online – п»їlegitimate online pharmacies india
Rx Express Mexico: mexico pharmacies prescription drugs – mexican rx online
mexican mail order pharmacies: mexican rx online – mexican rx online
mexico pharmacies prescription drugs [url=https://rxexpressmexico.shop/#]mexican online pharmacy[/url] mexico drug stores pharmacies
MedicineFromIndia: MedicineFromIndia – indian pharmacy online shopping
medicine courier from India to USA: indianpharmacy com – indian pharmacy online shopping
medicine courier from India to USA [url=https://medicinefromindia.com/#]indian pharmacy[/url] Medicine From India
top online pharmacy india: MedicineFromIndia – medicine courier from India to USA
best rated canadian pharmacy: Generic drugs from Canada – canada drugs online review
adderall canadian pharmacy: Canadian pharmacy shipping to USA – thecanadianpharmacy
canadian pharmacy world reviews [url=https://expressrxcanada.shop/#]Generic drugs from Canada[/url] my canadian pharmacy rx
mexico pharmacies prescription drugs: mexico drug stores pharmacies – RxExpressMexico
https://rxexpressmexico.com/# Rx Express Mexico
medicine in mexico pharmacies: Rx Express Mexico – Rx Express Mexico
mexico pharmacies prescription drugs: mexico pharmacy order online – RxExpressMexico
canadian pharmacy com: canadian medications – cross border pharmacy canada
canada drugstore pharmacy rx [url=http://expressrxcanada.com/#]ExpressRxCanada[/url] canadian pharmacy scam
canadian drug stores: Canadian pharmacy shipping to USA – online canadian pharmacy
mexican rx online: mexico pharmacy order online – Rx Express Mexico
indian pharmacy online [url=https://medicinefromindia.com/#]indian pharmacy online[/url] Online medicine home delivery
safe online pharmacies in canada: canadian pharmacy checker – my canadian pharmacy
indian pharmacy online shopping [url=https://medicinefromindia.shop/#]indian pharmacy online shopping[/url] indian pharmacy online shopping
Rx Express Mexico: mexico pharmacies prescription drugs – Rx Express Mexico
canada drug pharmacy: Buy medicine from Canada – canadian pharmacy online store
canadian pharmacy online [url=http://expressrxcanada.com/#]Express Rx Canada[/url] canadian pharmacy phone number
canadian pharmacy king: Canadian pharmacy shipping to USA – canadianpharmacyworld com
RxExpressMexico: RxExpressMexico – mexican online pharmacy
Acheter Cialis 20 mg pas cher: Acheter Cialis 20 mg pas cher – Acheter Viagra Cialis sans ordonnance tadalmed.shop
Tadalafil sans ordonnance en ligne [url=http://tadalmed.com/#]Acheter Cialis[/url] Cialis en ligne tadalmed.com
Pharmacie sans ordonnance: Pharmacies en ligne certifiees – п»їpharmacie en ligne france pharmafst.com
Tadalafil 20 mg prix en pharmacie: Tadalafil 20 mg prix en pharmacie – Acheter Cialis tadalmed.shop
cialis generique: Pharmacie en ligne Cialis sans ordonnance – Tadalafil 20 mg prix en pharmacie tadalmed.shop
acheter kamagra site fiable: achat kamagra – acheter kamagra site fiable
pharmacie en ligne pas cher: Livraison rapide – pharmacies en ligne certifiГ©es pharmafst.com
pharmacie en ligne fiable [url=https://pharmafst.shop/#]Meilleure pharmacie en ligne[/url] Pharmacie sans ordonnance pharmafst.shop
pharmacie en ligne pas cher: pharmacie en ligne pas cher – pharmacie en ligne sans ordonnance pharmafst.com
Acheter Cialis: Tadalafil sans ordonnance en ligne – Achat Cialis en ligne fiable tadalmed.shop
kamagra livraison 24h: Acheter Kamagra site fiable – Kamagra Commander maintenant
http://kamagraprix.com/# kamagra livraison 24h
kamagra en ligne: acheter kamagra site fiable – kamagra gel
kamagra gel: kamagra en ligne – kamagra livraison 24h
kamagra 100mg prix: Kamagra Commander maintenant – achat kamagra
https://kamagraprix.shop/# Kamagra pharmacie en ligne
pharmacie en ligne france fiable: Livraison rapide – п»їpharmacie en ligne france pharmafst.com
Cialis sans ordonnance 24h: Tadalafil sans ordonnance en ligne – Cialis sans ordonnance 24h tadalmed.shop
pharmacie en ligne avec ordonnance: Pharmacie en ligne France – pharmacie en ligne france fiable pharmafst.com
pharmacie en ligne france pas cher [url=http://pharmafst.com/#]Pharmacie en ligne France[/url] acheter mГ©dicament en ligne sans ordonnance pharmafst.shop
Acheter Cialis: Tadalafil 20 mg prix sans ordonnance – Cialis sans ordonnance 24h tadalmed.shop
pharmacie en ligne avec ordonnance: pharmacie en ligne france livraison belgique – Pharmacie en ligne livraison Europe pharmafst.com
pharmacie en ligne pas cher: Medicaments en ligne livres en 24h – Pharmacie Internationale en ligne pharmafst.com
Cialis sans ordonnance pas cher: Cialis sans ordonnance 24h – Pharmacie en ligne Cialis sans ordonnance tadalmed.shop
https://tadalmed.shop/# Acheter Viagra Cialis sans ordonnance
acheter mГ©dicament en ligne sans ordonnance [url=https://pharmafst.com/#]pharmacie en ligne[/url] trouver un mГ©dicament en pharmacie pharmafst.shop
pharmacie en ligne pas cher: pharmacie en ligne sans ordonnance – vente de mГ©dicament en ligne pharmafst.com
Achat mГ©dicament en ligne fiable: Medicaments en ligne livres en 24h – pharmacie en ligne france fiable pharmafst.com
Kamagra pharmacie en ligne: Kamagra pharmacie en ligne – Achetez vos kamagra medicaments
Tadalafil 20 mg prix sans ordonnance [url=https://tadalmed.shop/#]cialis sans ordonnance[/url] Cialis sans ordonnance 24h tadalmed.com
cialis generique: Tadalafil achat en ligne – cialis sans ordonnance tadalmed.shop
Acheter Viagra Cialis sans ordonnance: cialis sans ordonnance – Tadalafil 20 mg prix en pharmacie tadalmed.shop
Cialis en ligne: Cialis en ligne – cialis generique tadalmed.shop
kamagra oral jelly: kamagra livraison 24h – Acheter Kamagra site fiable
achat kamagra [url=https://kamagraprix.com/#]acheter kamagra site fiable[/url] kamagra en ligne
п»їpharmacie en ligne france: trouver un mГ©dicament en pharmacie – pharmacie en ligne pharmafst.com
Achat mГ©dicament en ligne fiable: pharmacie en ligne sans ordonnance – Achat mГ©dicament en ligne fiable pharmafst.com
cialis generique: Cialis sans ordonnance 24h – cialis sans ordonnance tadalmed.shop
Pharmacie en ligne Cialis sans ordonnance [url=https://tadalmed.shop/#]Cialis sans ordonnance pas cher[/url] Cialis sans ordonnance 24h tadalmed.com
kamagra en ligne: Achetez vos kamagra medicaments – Acheter Kamagra site fiable
Cialis en ligne: Tadalafil achat en ligne – Cialis sans ordonnance 24h tadalmed.shop
pharmacie en ligne france pas cher: Meilleure pharmacie en ligne – acheter mГ©dicament en ligne sans ordonnance pharmafst.com
Cialis sans ordonnance 24h: cialis sans ordonnance – Cialis sans ordonnance 24h tadalmed.shop
trouver un mГ©dicament en pharmacie [url=https://pharmafst.com/#]Meilleure pharmacie en ligne[/url] pharmacie en ligne france fiable pharmafst.shop
kamagra livraison 24h: achat kamagra – Kamagra Commander maintenant
п»їpharmacie en ligne france: pharmacie en ligne sans ordonnance – Achat mГ©dicament en ligne fiable pharmafst.com
Acheter Cialis: Tadalafil 20 mg prix en pharmacie – Acheter Cialis 20 mg pas cher tadalmed.shop
vente de mГ©dicament en ligne: Livraison rapide – pharmacie en ligne france livraison belgique pharmafst.com
Acheter Kamagra site fiable: kamagra gel – Kamagra Commander maintenant
olympe casino: olympe casino cresus – olympe casino
Pingback: Create Your Perfect Kitchen Coffee Bar: Step-by-Step Guide
Love it! I am thinking of making a coffee and wine bar this year.